
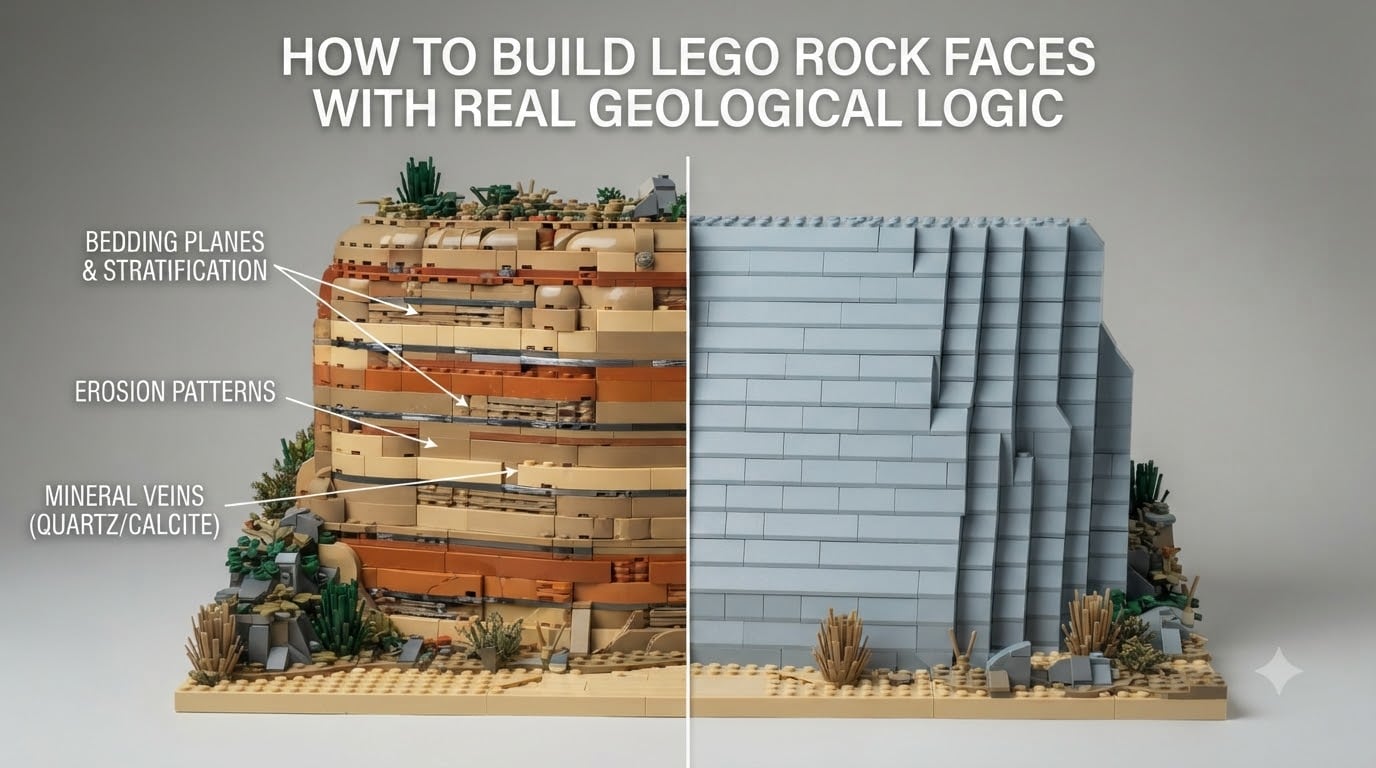
Most LEGO rock faces fail for one reason: they look like stacks of grey slopes, not actual rock. I built my first mountain at 14 using every dark grey slope I owned, and the result looked like a pile of toast. It took me years to realize the issue was not technique. It was geology.
Real rock faces form through stratification, bedding planes, erosion, and weathering. When you map these real geological processes onto your LEGO techniques, the difference is immediate. This guide teaches you how to build LEGO rock faces with real geological logic, so your cliffs, mountains, and rock walls stop looking like plastic and start looking like stone.
Table of Contents
Why Most LEGO Rock Faces Look Fake
I have studied hundreds of community builds, and the same mistakes appear over and over. Builders stack slopes in the same direction. They use one shade of grey. They line everything up in perfect rows. Real rock does none of these things.
The Reddit community pointed this out years ago in a thread about a builder’s first rockwork attempt. Experienced builders replied that rock should be mostly one color, with thin veins of different mineral running through it. The advice to “look up real rock faces and cliffs for reference” is the single most useful tip I have ever received about rockwork.
Geological logic fixes all three problems at once. When you understand how a real cliff forms, you naturally avoid uniform slopes, single-color masses, and repetitive grids.
The Geology of a Rock Face: What Builders Need to Know
Before picking up a slope brick, study how real rock faces form. Four concepts will change every build you make.
Stratification
Stratification is the layering of rock over time. Sedimentary rocks form in horizontal beds as minerals settle in water or air. Each layer represents a different era, with different mineral content and color. This is why real cliffs show visible bands.
Your LEGO equivalent is color layering. Use 2×4 or 1×2 plates in slightly different shades stacked horizontally to suggest different mineral bands.
Bedding Planes
Bedding planes are the surfaces between sedimentary layers. They are often weaker than the rock itself, which means erosion carves them out first. The result is the horizontal step you see on every natural cliff face.
In LEGO, bedding planes are the horizontal seams where one slope meets another. Use SNOT techniques and curved slopes along these seams to suggest them.
Joints and Faults
Joints are vertical cracks that form when rock is stressed. Faults are the same idea on a larger scale, where rock shifts. Both create the angular, fractured look you see on mountains.
Your LEGO version is the mixel joint, ball joint, and technic pin connection. These let you change direction abruptly without breaking the visual logic.
Erosion
Erosion is the carving away of rock by water, wind, and ice. It creates rounded edges, undercut sections, and the broken texture at the base of every cliff.
In LEGO, erosion is the hardest effect to fake. We cover specific techniques for it later in this guide.
How to Build LEGO Rock Faces: Three Rock Types
Different real rocks produce different LEGO techniques. Match your technique to your reference.
Sedimentary Rock Faces
Sedimentary rocks like limestone and sandstone form in clear horizontal layers. The defining feature is visible bands of slightly different color.
To mimic sedimentary rock in LEGO, build mostly horizontally with consistent slope direction. Mix three close shades of tan, dark tan, and reddish brown in 1×2 and 1×3 plates along the layering lines. Use cheese slopes for the gentle erosion between layers.
Igneous Rock Faces
Igneous rocks like granite and basalt form from cooled magma. They show vertical fractures, no horizontal bands, and uniform color.
To mimic igneous rock in LEGO, build with fewer horizontal seams. Use vertical orientation with clip-and-bar techniques to suggest joints. Stick to one color family across the whole build, with darker pieces only in the fracture lines.
Metamorphic Rock Faces
Metamorphic rocks like marble and slate started as one type, then changed under heat and pressure. They show wavy bands and folded patterns.
To mimic metamorphic rock in LEGO, alternate SNOT and studs-up building along the same face. Use mixel joints to introduce sudden direction changes that suggest folding. Color should be smoother than sedimentary, with veins rather than bands.
Slope-Based Rockwork: The Foundation Technique
Slope stacking is the workhorse of every rock face you will ever build. Get this right, and everything else follows.
Here is the step-by-step process I use for every slope-based rock face.
Step 1. Build a solid core out of bricks or plates. The core determines the shape of your final rock face, so plan the silhouette carefully.
Step 2. Cover the core with slopes in your dominant angle. I use 33-degree slopes (Element ID 4169 and similar) as my default for natural-looking rock.
Step 3. Stagger the slope ends so no two adjacent rows line up vertically. This single rule kills 80% of the fake-looking rockwork I see.
Step 4. Vary the slope direction. Some rows should slope up to the right, others up to the left, others at 45 degrees. Real erosion is not symmetrical.
Step 5. Use 1×1 slopes and 1×2 slopes together. Mixing widths breaks the grid that your eye picks up automatically.
Step 6. Leave a few corners unfinished with cheese slopes or inverted slopes. These suggest the rounded edges of weathered rock.
SNOT Rock: Sideways Building for Horizontal Striations
SNOT stands for Studs Not On Top. It is a sideways building technique that lets you attach pieces to the sides of bricks rather than the top. For rockwork, SNOT is what creates horizontal striations that look like real bedding planes.
The basic SNOT rock technique uses brackets, clips, or headlight bricks to attach a sideways face to a hidden internal structure. Once your face is oriented sideways, you can stack 1×2 plates in horizontal lines to suggest sediment layers.
My preferred SNOT approach for geological rockwork uses three steps. First, build the internal armature from technic bricks. Second, attach headlight bricks or 1×2 plates with clips to the side of that armature. Third, add slope pieces to the headlight bricks so the visible face shows consistent horizontal lines.
SNOT is also where you fake mineral veins. Drop a 1×1 plate in a contrasting color every 8-12 studs along the seam. The eye reads this as a thin vein of quartz or feldspar.
Curved Pieces and Organic Shaping
Curved slopes, wedges, and bow pieces are how you escape the geometric look of standard slopes. The LEGO wedge plate family (1×2, 1×3, 1×4 in various angles) is your friend here.
Curved slopes work best at transition points. Where one slope direction meets another, drop in a curved 1×1 or 1×2 slope to soften the corner. This mimics the way real rock erodes smoothly at stress points rather than at sharp angles.
For larger organic shapes, try boat hull pieces and inverted boat hulls. Genevaduran’s LEGO rockwork guide uses boat hulls as full rock faces, and it works because the curve is subtle enough to read as weathered stone.
Color Layering for Realistic Stratification
Color is where most builders give up. They grab a pile of light bluish grey slopes and call it done. Real rock has more nuance than this.
Three rules will fix your color instantly. First, pick a dominant color and stick to it for at least 70% of the build. A sandstone cliff should be mostly dark tan. A granite mountain should be mostly dark bluish grey.
Second, pick two supporting colors at most. For sandstone, use reddish brown and medium nougat. For granite, use dark stone grey and black.
Third, use the supporting colors only at layer lines, joints, and erosion points. The geological logic here is simple: different colors appear at transitions between rock types or where minerals concentrate.
A useful tip from a builder on Reddit: keep rock mostly one color with thin veins of different mineral. This matches the geology and the eye reads it as natural.
Simulating Erosion and Weathering in LEGO
No competitor covers erosion simulation, so this is your edge. Real erosion produces three effects you can fake: rounded edges, undercut bases, and broken texture.
For rounded edges, replace 50% of your corner slopes with curved slopes. Real rock does not have sharp 90-degree edges anywhere, and your LEGO version should not either.
For undercut bases, build the lower 4-6 studs of your rock face inward by half a plate width. This creates the overhang that water erosion produces. Use wedge plates to make the transition smooth.
For broken texture, scatter single studs of contrasting color across the rock face. These read as broken-off chunks and mineral inclusions. Do not overdo it: 1 stud per 50 surface studs is enough.
Advanced Techniques: Off-Grid and Technic Reinforcement
Once you have the basics down, two advanced techniques will push your rockwork into the next tier.
Off-grid building uses parts attached in non-standard orientations to break the LEGO grid. Mixel joints, ball joints, and droid arms all let you rotate pieces to any angle. The visual effect is rock that does not look built from a kit.
Technic reinforcement is what holds an off-grid build together. Hidden technic beams inside your rock face give you anchor points for mixel joints and clips. The bricknerd guide to lattice methods uses technic rods running through the build as a skeleton. I use this for any rock face over 30 studs tall.
Avoiding Repetitive Patterns
The forum community flagged repetitive patterns as the biggest giveaway of amateur rockwork. Here is how to avoid them.
Vary slope angles. If you use 33-degree slopes for one row, try 25-degree or 45-degree slopes for the next. Real rock does not stack at uniform angles.
Vary piece widths. Mix 1×1, 1×2, 1×3, and 1×4 slopes in the same row. The eye picks up uniform widths as repetition.
Vary colors at irregular intervals. If your mineral vein runs every 10 studs, change it to every 7, then every 13. Natural patterns are not periodic.
Vary direction. Every 5-7 rows, flip your slope direction. Left-facing slopes for three rows, right-facing slopes for two rows, then back. This breaks the marching-band look.
The simplest test: if you can close your eyes and predict the next piece, the pattern is too regular. Change something until you cannot.
Frequently Asked Questions
How do you build LEGO rocks that look realistic?
Build with mostly one color, add thin mineral veins in a contrasting color, stagger slope ends so no two rows line up, and reference real rock faces for the layering pattern. Geological logic produces more realistic results than stacking more slopes.
What is SNOT building in LEGO?
SNOT stands for Studs Not On Top. It is a sideways building technique that lets you attach pieces to the sides of bricks rather than the top. SNOT is essential for creating horizontal striations that look like real bedding planes.
What slopes work best for LEGO rock faces?
33-degree slopes are the workhorse for most rockwork. Mix them with 25-degree slopes, 45-degree slopes, cheese slopes, and curved slopes for variety. Combining multiple angles avoids the repetitive look that single-slope stacks produce.
How do you avoid gaps in LEGO rockwork?
Build a solid internal core out of bricks or plates first, then cover it with slopes. The core eliminates gaps that appear when you try to build rockwork out of slopes alone. Technic beams inside the core give you anchor points for SNOT pieces.
What is the 5/2 rule in LEGO?
The 5/2 rule is a community term for the offset pattern in SNOT building. Place a stud at position 5 on one row and position 2 on the next row to create a staggered bond pattern, similar to brickwork in real masonry.
Build Your First Geological LEGO Rock Face Today
You now have the full system for building LEGO rock faces with real geological logic. Pick one technique from this guide and apply it to your next build: stagger your slopes, add a mineral vein, or try SNOT along one face. Each small change makes the rock more believable.
The builders whose work stands out are the ones who treat rockwork as geology, not just slopes. Reference real cliffs, study the bands and joints, and let the geological logic guide your technique. Your next LEGO rock face will look like it belongs in the landscape rather than on a shelf.