
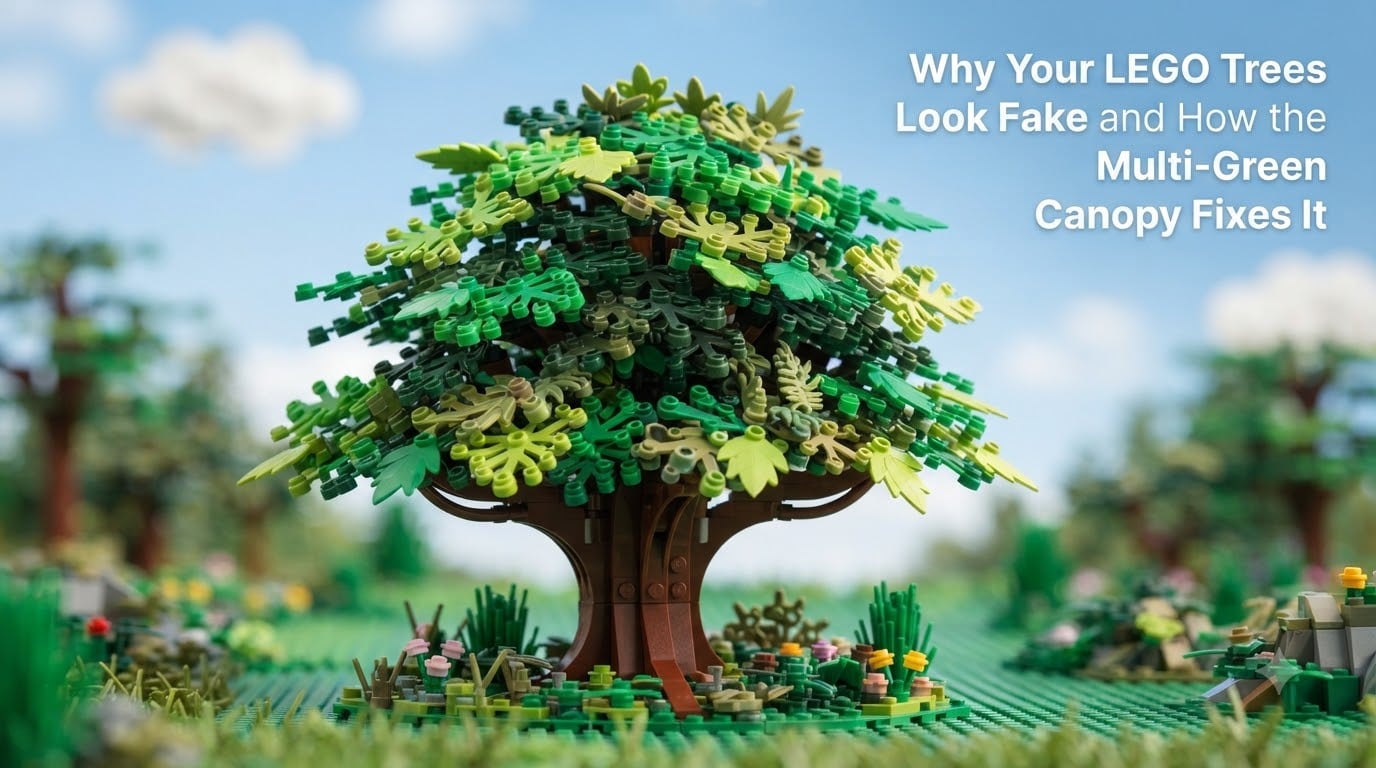
I spent two years wondering why my LEGO trees looked like plastic props instead of actual plants. Then I tried a single change to my canopy building technique, and every forest scene I built after that looked noticeably more natural. The fix was simpler than I expected: stop using one shade of green and start mixing several.
If you have ever finished a LEGO landscape and felt like your trees looked fake, the canopy color is almost always the culprit. In this guide I will walk you through exactly why LEGO trees look fake, what the multi-green canopy technique does, and how to apply it on your next build.
Table of Contents
Why LEGO Trees Look Fake: The Single-Green Problem
LEGO trees look fake primarily because they use a single shade of green for the entire canopy. A tree built only from bright green leaves or only from dark green leaves ends up with a flat, painted-on color that real plants never have.
Look at any photo of a real oak, maple, or birch. You will see light green highlights on the upper leaves, deep green in the shaded layers, and sometimes yellow or brownish tones mixed in. Real foliage has color variation caused by sun direction, leaf age, moisture, and species differences.
When you build a tree from one green only, your eye reads it as artificial because no natural object has that uniform tone. Reddit builders have posted about this exact issue, noting that light green leaves look especially harsh next to grass plates. The community has called it out for years, but the fix is rarely explained in detail.
The Flat Color Problem
A single-shade canopy creates what designers call color monotony. Your brain expects variation in a tree because every real tree you have seen has it. Without variation, the build signals “toy” instead of “model.”
This is why even an expensive LEGO Botanical Collection set can look slightly off if it relies on one canopy color. The shapes and proportions are right, but the color tells a different story.
Why Natural Trees Have Multiple Greens
Outdoor foliage always has at least three to five distinct green tones in any given view. New growth at branch tips is lighter. Mature leaves in the middle canopy are mid-green. Inner shaded leaves read dark green or almost black. When sunlight filters through, you even get yellow-green highlights.
Replicating that variation in LEGO means building with parts in different shades. That is the entire idea behind the multi-green canopy technique.
The Science Behind Multi-Green Canopy Mixing
The multi-green canopy technique involves mixing different green shades (light green, dark green, bright green) in the tree canopy to create natural color variation. It is not random mixing. It follows basic color theory that artists and model makers have used for decades.
When I first tested this, I took one of my old trees apart and rebuilt the canopy using the same part type in three colors. The result looked like a different tree, even though the trunk and branches were unchanged.
Three Greens Every Builder Needs
You do not need twenty different greens to fix the fake look. Three shades will cover most realistic tree builds.
- Dark green for the inner canopy and shaded sections
- Medium green as your dominant filler color
- Light or yellow-green for sunlit highlights on outer branches
Some builders also add olive or sand green for variety, but those three are the foundation.
The 60-30-10 Mixing Rule
Interior designers use a rule where 60 percent of a space is one color, 30 percent is a secondary, and 10 percent is an accent. The same idea works on a LEGO tree canopy.
Make your medium green about 60 percent of the leaves. Use dark green for 30 percent, mainly in the lower and inner sections. Reserve 10 percent for light or yellow-green, sprinkled on the outer tips where sunlight would hit.
This ratio stops the canopy from looking too busy. Too much variety can also look unnatural. The 60-30-10 split keeps the eye comfortable while still adding visible depth.
Step-by-Step Multi-Green Canopy Technique
Here is the exact process I use on every LEGO tree I build now. It takes about ten extra minutes compared to a single-color build, and the difference is immediate.
Step 1: Plan Your Canopy Layout
Before snapping any leaves on, sort your canopy parts by color into three piles. Decide which side of the tree will face your light source in the final display. That side gets more light green.
If your tree will sit in the middle of a layout with light coming from above, treat the top and outer edges as the lit areas. The lower and inner sections will be in shadow.
Step 2: Anchor With a Dominant Green
Start by attaching your medium green leaves around the branch structure. Spread them evenly to form the base shape of the canopy. Do not cluster them all in one spot.
This layer is your 60 percent. It defines the tree’s overall silhouette.
Step 3: Add Dark Green for Shadow
Now drop dark green leaves into the lower portions of the canopy and into any area that will be hidden behind other leaves. These read as the shaded interior of the tree.
This is your 30 percent. Without dark green, the tree loses depth and looks like a flat green blob.
Step 4: Sprinkle Light Green on the Outside
Finally, attach light or yellow-green leaves on the outermost tips and on the side facing the light. Keep this layer sparse, around 10 percent of the total.
Step back and look at the tree from three feet away. If the colors look balanced rather than patchy, you are done.
Best LEGO Parts for Multi-Green Canopies
Not all LEGO plant parts work equally well for this technique. Here are the part categories I have tested and what each one brings to a multi-green canopy.
Light Green Leaf Elements
The standard small leaf in bright green is a great highlight piece. It comes on many newer tree sets and reflects light well. Use it on outer branches to mimic sunlit new growth.
For smaller trees, one leaf per branch tip is enough. For larger trees, group three to five on each upper branch.
Dark Green Leaf Elements
The same small leaf mold in dark green is your shadow tool. Dark green leaves are less common in standard sets but easy to source from Pick a Brick or third-party sellers.
Place these in the inner canopy, where they peek through gaps in the medium green layer. They create the depth that single-color builds always lack.
Bright Yellow-Green Accents
The newest LEGO botanical parts include a yellow-green tone that looks almost like new spring growth. Use this sparingly. One yellow-green leaf for every ten medium green leaves is plenty.
Yellow-green also works well on deciduous trees in early summer scenes. For autumn builds, swap yellow-green for dark orange or rust parts.
Common Mistakes That Make LEGO Trees Look Fake
Even with multi-green mixing, a few common errors can undo your work. Here are the mistakes I made when I first started.
Clumping One Color in One Spot
If you place all your dark green on one side and all your light green on another, the tree looks striped rather than naturally varied. Real trees have color variation mixed throughout, not in zones.
Spread each color across the whole canopy, with most of it concentrated in its intended area but a little scattered everywhere.
Ignoring Trunk Color
A perfectly mixed canopy on a bright red-brown trunk still looks fake. The trunk should be dark brown, reddish brown, or even gray for birch-style trees.
If your trunk color is too saturated, the whole tree reads as plastic regardless of how good the canopy looks.
Using Only Two Greens
Two greens are better than one, but two is still not enough for a fully natural look. The third shade is what creates the convincing depth that sells the realism.
If you only have two green shades available, darken or lighten one with a light application of paint. Many builders do this, although it does change the piece’s official status.
Advanced Techniques for Different Tree Types
Once you have the basic multi-green canopy down, you can adapt it for different species. Each type of tree has its own color rhythm.
Deciduous Trees
Oak, maple, and beech trees have broad, rounded canopies. Use larger leaf elements and a wider spread of colors. The 60-30-10 ratio works perfectly here.
For oak specifically, push the medium green toward a slightly darker shade, since oak leaves tend to read deeper than maple leaves.
Coniferous Trees
Pine and fir trees have spikier, more vertical canopies. Use the small leaf or pine needle elements and lean toward darker greens overall. Conifers typically have less yellow-green than deciduous trees.
A ratio closer to 70-25-5 works for pines, since their color variation is more subtle.
Autumn Trees
For fall colors, swap green entirely for orange, red, and yellow parts, but apply the same 60-30-10 mixing principle. Dominant orange, secondary red, and yellow accents.
Adding a few lingering green leaves can suggest early autumn and add extra realism.
Frequently Asked Questions
How do I make my LEGO trees look realistic?
Mix at least three shades of green in the canopy using a 60-30-10 ratio. Use medium green as the dominant color, dark green for shadowed inner sections, and light or yellow-green for sunlit outer tips. Match the trunk color to real bark tones and avoid using only one green shade.
Why do my LEGO trees look fake?
Single-color canopies make LEGO trees look fake because real trees always show variation in leaf color. Sun direction, leaf age, and species differences produce multiple green shades in any real tree. A uniform green canopy reads as artificial to the eye.
What greens should I mix for a multi-green canopy?
Use dark green, medium green, and light or yellow-green as your three core shades. Apply medium green to about 60 percent of the canopy, dark green to 30 percent, and light green to 10 percent. This creates the depth that single-color builds always lack.
How many colors do I need for a natural-looking LEGO tree?
Three shades of green are enough for most realistic trees. Two greens are better than one, but the third shade is what creates the convincing depth that sells the realism. For autumn builds, swap greens for orange, red, and yellow using the same mixing principle.
Is the LEGO bonsai tree hard to build?
The LEGO bonsai set is moderate in difficulty but forgiving because the canopy is small and uses fewer parts. Apply the multi-green canopy technique by mixing dark and light green leaves for extra realism, even on the official set pieces.
What LEGO parts work best for tree canopies?
The small leaf element in light, medium, and dark green is the most versatile canopy part. For larger trees, combine small leaves with larger leaf molds or plant elements. Pine needle parts work for coniferous trees, while standard leaves suit deciduous builds.
Final Thoughts on Fixing LEGO Trees That Look Fake
The reason LEGO trees look fake almost always comes down to a single-color canopy, and the multi-green canopy fix is one of the highest-impact changes you can make to a LEGO landscape. Mix three shades, follow the 60-30-10 ratio, and watch for the common clumping mistakes.
Try the technique on your next tree build and see how it changes the whole scene. You will probably never go back to single-color canopies again.