
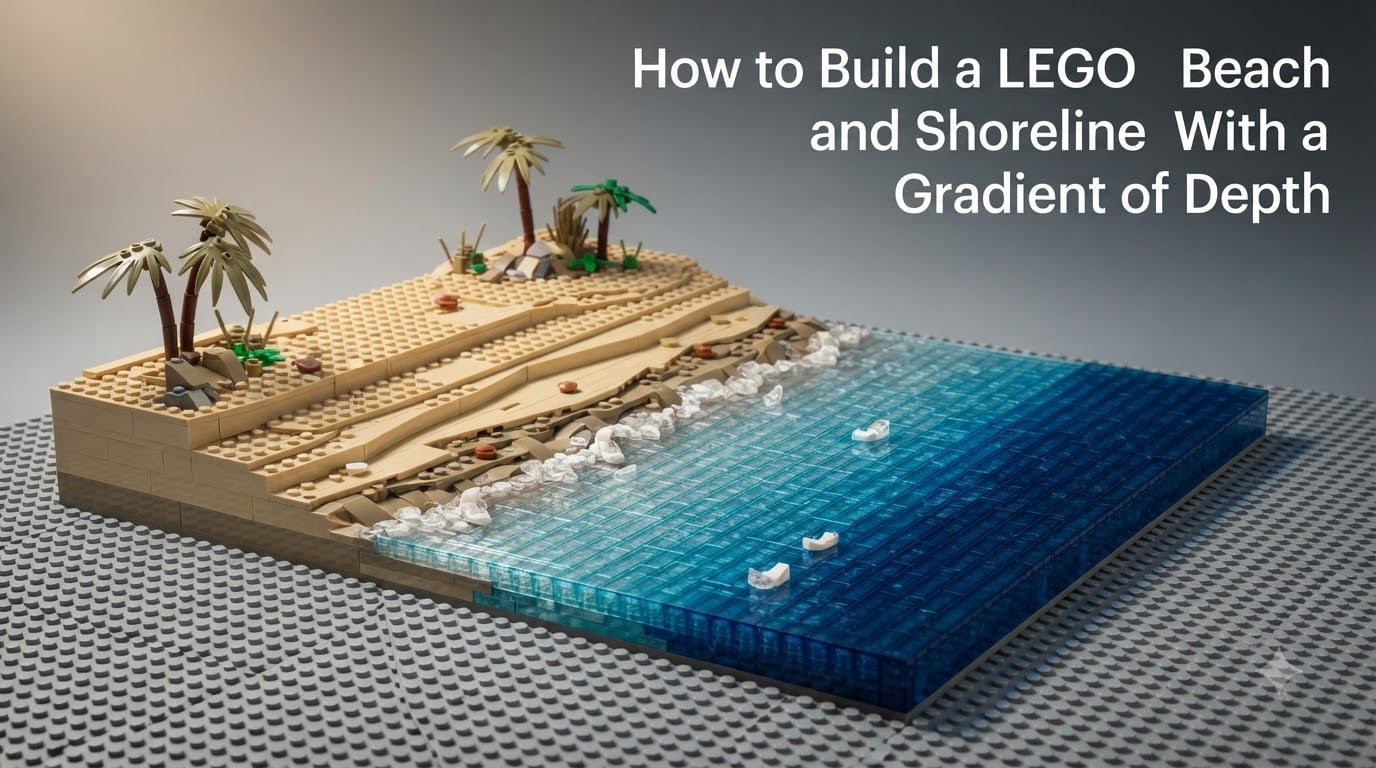
Flat LEGO beaches look, well, flat. I spent two years assuming beach scenes just required the right blue and tan plates until I watched a builder on Reddit explain that the entire trick lives above the baseplate. Push the sand up two bricks, drop your colors from clear to deep blue as you move offshore, and suddenly your shoreline looks like it belongs in a postcard instead of a preschool diorama.
This guide on how to build a LEGO beach and shoreline with a gradient of depth walks through every layer of that illusion. I cover baseplate prep, sand elevation, shoreline transitions, water color progression, wave effects, and the mistakes I made so you don’t have to repeat them. By the end, you’ll have a beach scene that feels three-dimensional even though the whole build sits on a single flat plate.
Table of Contents
What Is the Gradient of Depth Technique in LEGO Beaches?
The gradient of depth technique is the practice of building your sand area above the baseplate level and layering water from clear near the shore to dark blue far offshore. Elevation gives the beach physical height. Color stratification tricks your eye into reading the deeper sections as water rather than flat tiles.
Most beginners assume the depth is optical. I did too. After building seven or eight beach MOCs, I realized the depth is mostly physical. Without a 2-brick lift, even perfect water color layering looks like decals on a tabletop.
The “5/2 rule” you’ll see referenced on LEGO forums refers to this same idea: 5 plates of sand elevation with 2 plate steps down to the water. It’s a quick shorthand for “lift the sand, step down twice, then drop into deeper water.” It’s not a hard law, more a starting point you can bend depending on your scene scale.
Setting Up Your LEGO Baseplate Foundation
Start with a clean, flat baseplate in a neutral color. I prefer dark green or light gray because neither fights the sand or water tones. Sand, tan, or white baseplates commit you to a fixed bottom too early.
Step 1. Map your build zones. Use a piece of paper or mental grid to divide the baseplate into thirds. Beach on one end, shoreline middle, water on the far end. Knowing your zones prevents the common mistake of building sand straight to the baseplate edge.
Step 2. Plan your water boundary. Before snapping a single sand plate, place trans-blue or blue plates along the future water edge. These act as bumpers so you don’t accidentally extend your sand zone into water territory. I learned this the hard way after one MOC where the sand ate half the ocean because I never set a clean border.
Step 3. Test your footprint. Temporarily lay 1×4 or 1×6 tiles in your planned water and sand positions. Stand back. If your beach looks bigger than a city block, scale it down. Beach scenes work best when they fill roughly 40% of the baseplate and the water takes the rest.
Building the Sand Elevation Layer
Elevation is where most beach MOCs go wrong. Builders either skip it entirely or jump too high too fast, creating cliffs where they wanted gentle dunes. The goal is two to three brick heights above the baseplate, divided into plate-sized steps.
Use plates, not full bricks, for the rise. Plates give you fine control over the gradient. A 2×2 plate adds the equivalent of one third of a brick, which is enough to read as a step without looking like a retaining wall.
Layer 1 sits on the baseplate in dark tan for shadowed, slightly damp sand. Layer 2 goes up one plate and uses standard tan. Layer 3 (the dry beach back) uses a slightly bleached or lighter tan. This color shift upward adds visual interest before you even place a single water piece.
The gradient should slope gently, not stair-step perfectly. Stagger your plates in 1×2 segments so the visible edges form a soft sawtooth. From the front, the eye reads this as an organic dune line rather than a city sidewalk.
Creating the Shoreline Transition From Sand to Water
The shoreline is the trickiest zone because it has to be dry sand on one end and undercut by waves on the other. A clean transition uses SNOT techniques (Studs Not On Top), where the water plates hang from the side of the sand rise rather than stacking from below.
Attach your lowest water plate to the side of a 1×2 brick protruding from your sand elevation. The brick acts as the wave-cut ledge. The plate forms the undercut shadow where sand meets water. This single move creates more realism than any amount of color work because it implies erosion.
For wet sand, blend dark tan into a thin strip of brown or dark gray plates right at the water edge. Three to four studs deep is plenty. Wet sand never extends more than a centimeter or two from the actual waterline in real life, and your LEGO build should reflect that restraint.
Use 1×1 slopes sparingly along the boundary. One slope per two studs of shoreline is enough to suggest the lip of wave wash. Crowning the whole edge with slopes makes the beach look like it has a sharp curb, not a tide line.
Layering Water Colors for the Gradient of Depth Effect
Water color is where the gradient of depth sells itself. You’re not just placing blue. You’re placing a curve that drops from clear to deep blue as you move from shore to horizon.
Zone 1: Foam line. Use white or trans-clear plates in a one-stud-wide strip right at the wet sand. This represents the wave break. Without foam, water looks like poured paint instead of a liquid body.
Zone 2: Shallow water. Layer trans-light blue 1×2 tiles and 1×3 plates one to three studs out from shore. Trans-clear mixed in here adds the sparkle of sand showing through shallow waves.
Zone 3: Mid-depth. Switch to medium blue solid plates here. The eye reads the change from trans to solid as depth increasing. This transition usually happens two to four studs from shore.
Zone 4: Deep water. End with dark blue plates or even a few navy tiles in the back third. The contrast against the lighter zones near the shore carries the gradient of depth illusion.
For micro-shoreline builds (under 16×16 studs), compress all four zones into two: foam plus clear, then a step out to medium blue. Trying to fit four shades into a tiny footprint makes the water look like a candy stripe.
For city-scale builds (32×32 and up), you have room to add a fifth zone. Use sand-colored plates visible under trans tiles to create the tropical shallows effect, then a sudden drop to deep navy in the open ocean.
Adding Wave Effects and Water Texture
Flat water is dead water. Real water moves, even in a still photograph, and your LEGO beach should suggest that movement. Wave effects come from three sources: trans pieces, slopes, and white accents.
Lay a few 1×1 trans-clear plates on edge, sticking up between blue and dark blue zones. These catches “light” from the implied sun and break up the flat plate surface. Without them, your water looks like a swimming pool cover.
Use 1×2 slopes facing the shore to suggest incoming swells. Place one at the start of mid-depth, one at the boundary with deep water. They imply a wave train without you having to build actual crests.
For accent foam on individual waves, drop white 1×1 plates or curved slopes onto the tops of your slope pieces. This single white speck tells the viewer’s brain “wave crest” without any further detail.
Skip the wave detail at your own risk. I built a beach without waves once and the feedback was unanimous: it looked like a desert with a blue puddle next to it.
Common Mistakes to Avoid in LEGO Beach Builds
After years of trying different approaches, these are the mistakes that kill beach scenes most often.
Mistake 1: No elevation. Flat-on-baseplate sand looks like a parking lot with blue tiles next to it. Always lift the sand.
Mistake 2: One shade of water. Using a single blue color across the entire water zone kills the depth illusion. You need at minimum two blues, ideally three.
Mistake 3: Too much foam. A continuous white border looks like a swimming pool lane marker. Foam is dotted and broken in real life, not a painted stripe.
Mistake 4: Forgetting the undercut. If your water ends at the base of your sand rise without a side-attached plate, the shoreline reads as a sticker rather than a 3D feature.
Mistake 5: Wrong sand tone next to water. Dark wet sand belongs at the water edge, dry lighter tan belongs at the dune. Reversing these breaks the natural gradient.
Frequently Asked Questions
What is the 5/2 rule in LEGO?
The 5/2 rule is community shorthand for a beach elevation pattern: 5 plates of sand height stepping down over 2 plate levels into the water. It’s a starting point, not a strict rule, and you can adjust the ratio based on your scene scale. The principle matters more than the exact numbers – always lift your sand above the baseplate so depth reads as physical rather than optical.
How do you build a beach with LEGO?
Start with a clean baseplate, divide your area into sand and water zones, then elevate your sand layer 2 or more brick heights using plates. Layer tans from dark (wet sand) at the water edge to light (dry sand) at the back. Place a foam strip of white or trans-clear pieces at the shore, then progress water colors from trans-light blue near shore to dark blue far out. The elevation and color gradient together create the depth effect.
How do you make a smooth slope with LEGO?
Use plates instead of bricks for fine control – one plate is one third of a brick height, which reads as a gentle slope rather than a sharp step. Stagger plates in 1×2 segments so the visible edges form a soft, irregular pattern. Avoid placing plates in straight lines because clean parallel edges always read as artificial construction.
What LEGO pieces work best for water depth?
The most useful pieces for water depth are trans-clear and trans-light blue 1×2 tiles for shallows, solid medium blue 1×2 and 1×4 plates for mid-depth, and dark blue 2×2 or 2×4 plates for deep water. White 1×1 plates and curved slopes serve as wave foam. 1×1 slopes facing the shore imply wave crests without needing complex construction.
How high should LEGO sand be elevated above the baseplate?
For most builds, elevate sand 2 bricks (6 plates) above the baseplate. Smaller microscale builds can use as little as 3 plates of elevation. Larger city-scale builds benefit from 3 to 4 brick heights to make the beach feel proportional to surrounding structures. There is no exact height that works for every build – match the elevation to the scale of your scene.
Putting It All Together
A strong LEGO beach with a gradient of depth rests on two pillars working together. The first is physical elevation – 2 or more bricks of sand height, layered in plates, stepped gently toward the water. The second is color stratification – clear foam, trans shallows, mid blue, deep blue, reading as depth without a single transparent trick.
Pick a scale, plan your zones before placing any pieces, and remember that restraint matters more than any single technique. Less foam, fewer slopes, one less transition often looks better than piling on every effect at once. Build one layer at a time and stand back after each zone. Your eye will tell you what the next layer needs.
The whole build takes about an hour at the microscale and a full afternoon at city scale. Either way, you’ll end up with a beach that looks like it has actual ocean in front of it. That’s the payoff of learning the gradient of depth.