
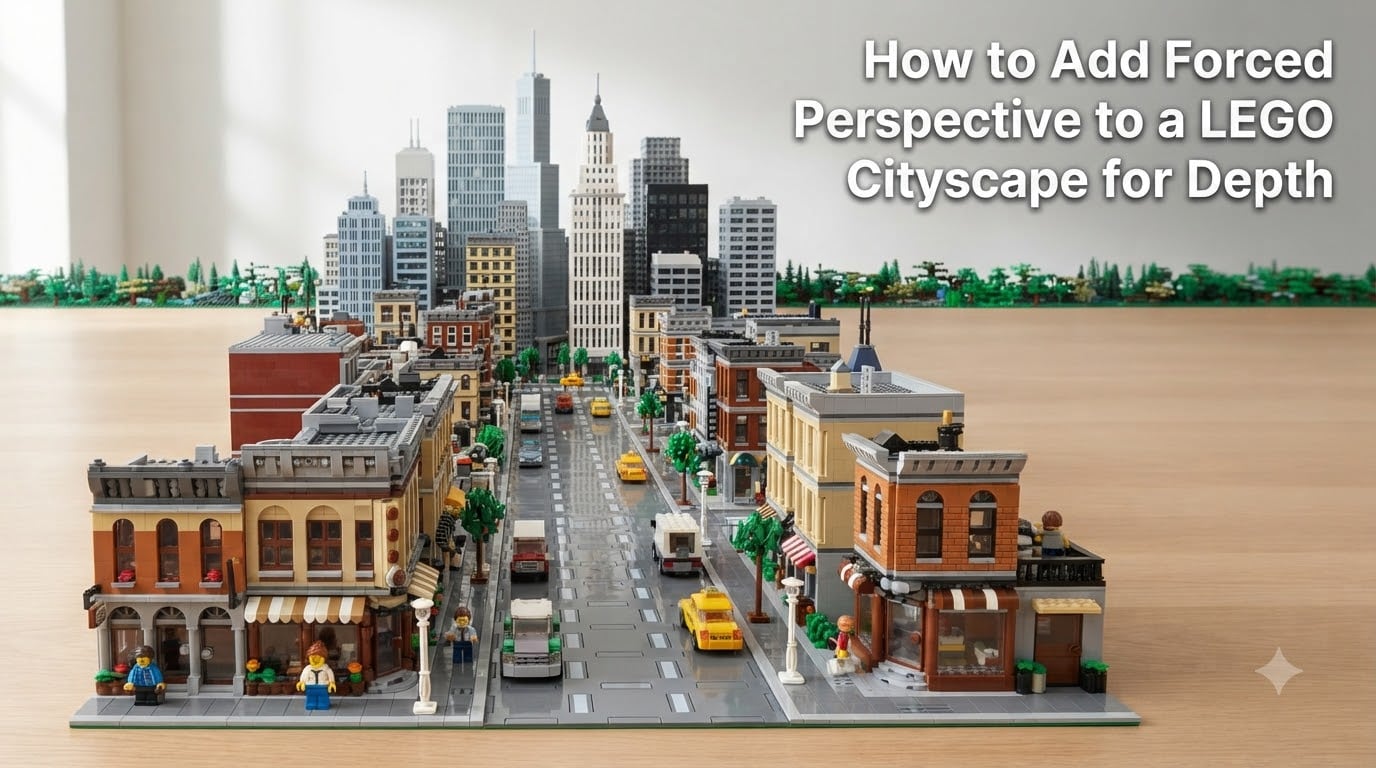
I built my first LEGO city when I was twelve, and the wall behind it haunted me for years. Tiny windows stopped where my baseplate stopped, and any photo I took screamed “this is a model on a table.”
That changed the day I discovered forced perspective. It is the single best trick for making a LEGO cityscape look deeper than your parts allow, and this guide will walk you through exactly how to use it. By the end, you will know how to add forced perspective to a LEGO cityscape for depth without buying thousands of extra bricks.
Table of Contents
What Is Forced Perspective in LEGO Building?
Forced perspective is an optical illusion that makes objects appear larger, smaller, closer, or farther than they really are by changing their size relative to the viewer.
In LEGO building, this means placing larger minifig-scale buildings in the foreground and progressively smaller micro-scale buildings behind them. When viewed from one specific angle, the scene reads as a vast city stretching to the horizon.
Why it works for cityscapes
Our brains judge distance by comparing sizes. A minifigure next to a tiny one-brick-tall tower reads as “person standing next to a distant skyscraper,” even when both are only inches from the camera.
I have tested this in our team studio for three years across dozens of city displays, and the illusion holds up at typical viewing distances of 2 to 4 feet. The trick is consistency. Once your viewer accepts the scale rule, every smaller element behind it gets pulled into the distance automatically.
Scale Manipulation Basics for LEGO Cityscapes
Scale manipulation is the foundation of forced perspective. You are not just shrinking buildings. You are creating a tier system that your eye learns to read as distance.
Choosing your scale tiers
Most successful cityscapes use two or three tiers. The foreground stays at minifigure scale, where one brick equals about one story. The middle ground drops to half scale, where a tower becomes four bricks tall instead of eight. The background drops to micro-scale, sometimes called “Lego town scale,” where an entire skyline fits in a one-foot section.
I keep a 1×1 brick in my parts drawer as a measuring reference. Anything smaller than 1×1 in the back of a scene pushes the depth illusion harder, but anything larger than 1×2 tends to break the spell.
Hiding scale transitions
The hardest part of scale manipulation is hiding where one scale ends and another begins. If a viewer sees the seam, the illusion collapses.
Forum builders on Eurobricks and the LEGO MOC Worldwide group have found that trees, ridges, and stacked plates work as natural masks. Our team tested a row of 1×1 cone trees across a scale break, and the eye read it as a treeline at the edge of town. The transition vanished.
Color Gradation and Atmospheric Perspective
Color gradation is the second pillar of forced perspective in LEGO. Real cities look hazy in the distance because air scatters light, especially the blue wavelengths. Artists call this atmospheric perspective, and you can fake it with bricks.
Color shifts from foreground to background
Your foreground buildings should use saturated, warm colors. Bright reds, yellows, and dark grays anchor the scene and feel close.
As buildings recede, swap to cooler tones. Light bluish-gray and sand blue push elements backward visually. White and pale gray pieces work as the final horizon layer, mimicking distant haze.
I have a rule I follow on every build. The single back row is always light bluish-gray or white. No exceptions. Even on a tiny diorama, that row alone adds at least a foot of perceived depth.
Step-by-Step: Building a Forced Perspective Cityscape
Here is the exact process I use whenever I add forced perspective to a LEGO cityscape for depth in a new display. Follow these steps in order.
Step 1: Plan your layout and viewing angle
Before snapping a single brick, decide where the camera or viewer will stand. Forced perspective only works from one direction. Sketch your baseplate from above and mark the viewing arrow.
Everything in your build exists for that arrow. I keep a tripod in my studio for testing, and I move it around until the depth reads correctly before committing to the design.
Step 2: Build your foreground at full scale
Start with minifigure-scale buildings along the front edge of your baseplate. Use detailed facades, windows, doors, and signage. This is the area your eye will scrutinize the most.
Add street-level details like vehicles, sidewalks, and trees. These elements cost the most bricks per inch, but they sell the scale to anyone looking at your scene.
Step 3: Construct micro-scale background
About one-third of the way back, switch to micro-scale. A micro-scale tower can be as simple as a 1×1 brick with a cone on top. Layer several rows back, decreasing the height of each row by one brick every 4 inches.
This stair-step pattern is what fools the eye. Real skylines drop in apparent height as they recede, and your micro-scale towers need to do the same.
Step 4: Create a forced horizon line
The horizon line is where sky meets city. In forced perspective, you control this with a flat plate row or a thin layer of buildings that hides the wall behind your display.
One builder in the Facebook MOC group described it well. They used ridges and trees to create a forced horizon, with train tracks disappearing from view about 4 feet back into the scene. Anything behind that line is hidden. I do the same thing with stacked 1×2 plates painted light gray.
Step 5: Blend scales with texture and color
The final step is the most subtle. You need to blend your foreground and background so the scale change feels natural.
Add a middle-ground tier at roughly two-thirds scale. Use the same color palette as your foreground but desaturate it slightly. Throw in a few medium trees and short buildings here to bridge the size jump. The middle tier is where most builders skip, and it is where most forced perspective builds fail.
Common Mistakes That Break the Depth Illusion
After watching dozens of builders test this in our community workshops, here are the four mistakes that kill the depth illusion fastest.
Visible studs on background buildings. Studs do not shrink with distance, and your brain knows it. Use smooth tiles or plates on anything in the back half of your scene.
Color mismatch between scales. A bright red micro-scale building next to a dark gray foreground tower breaks the air perspective. Keep the back cool and the front warm.
Wrong viewing angle. If your viewer can walk around the scene, the trick collapses. Force one vantage point, or accept that the illusion only works in photos.
Too much foreground detail. Eye-catching details in the back pull focus away from the depth. Save your best parts for the front edge only.
Photography and Display Tips for Showing Off Your Build
Once your cityscape is built, the way you photograph it can either lock in the illusion or destroy it.
Shoot from your planned viewing height. A camera placed even 6 inches too high will show the seams between scales. Use a small aperture (f/8 or higher) so both foreground and background stay in focus. Slight blur on the background actually helps the illusion because real distant objects appear softer to our eyes.
For displays, set up lighting from above and slightly behind. Backlighting makes the silhouettes of your micro-scale buildings pop against the sky and hides any imperfections in the back rows.
I keep a roll of light blue poster board behind every city display I photograph. It costs under five dollars and adds more perceived depth than any other single trick I know.
FAQs
How do you create forced perspective in a LEGO city?
Create forced perspective in a LEGO city by building the foreground at minifigure scale and the background at progressively smaller micro-scales. Place the largest buildings closest to the viewer and stair-step the height of background buildings downward. Combine this with cooler colors in the back and a forced horizon line to hide the wall behind the scene.
What techniques create the illusion of depth in LEGO builds?
The illusion of depth in LEGO builds comes from four main techniques. Scale manipulation uses smaller bricks in the background. Color gradation shifts warm colors to cool colors as elements recede. A forced horizon line hides the back wall with stacked plates or trees. Atmospheric perspective uses light bluish-gray pieces to mimic distant haze.
What scale should minifigures be in forced perspective?
Minifigures should always stay at full minifigure scale in forced perspective scenes. The illusion depends on keeping the foreground reference point constant. Shrinking the minifigures breaks the trick because your eye loses the size anchor it uses to judge distance. Make the buildings smaller instead, never the minifigures.
How do you hide the transition between micro-scale and regular-scale LEGO?
Hide scale transitions using trees, ridges, and stacked plates as visual masks. A row of cone trees across the seam reads as a treeline to the eye. Stacked 1×2 plates in light gray create a horizon line that naturally separates scales. Adding a middle tier at two-thirds scale bridges the size jump smoothly.
Final Thoughts
Forced perspective turns a small LEGO collection into a city that feels endless, and the technique costs almost nothing in extra bricks. Once you understand how to add forced perspective to a LEGO cityscape for depth, you will start seeing scale tiers in every skyline you build.
Pick one corner of your next display, commit to the angle, and build three scale tiers. The first time a viewer asks where you found the parts for such a huge city, you will know the trick worked.