
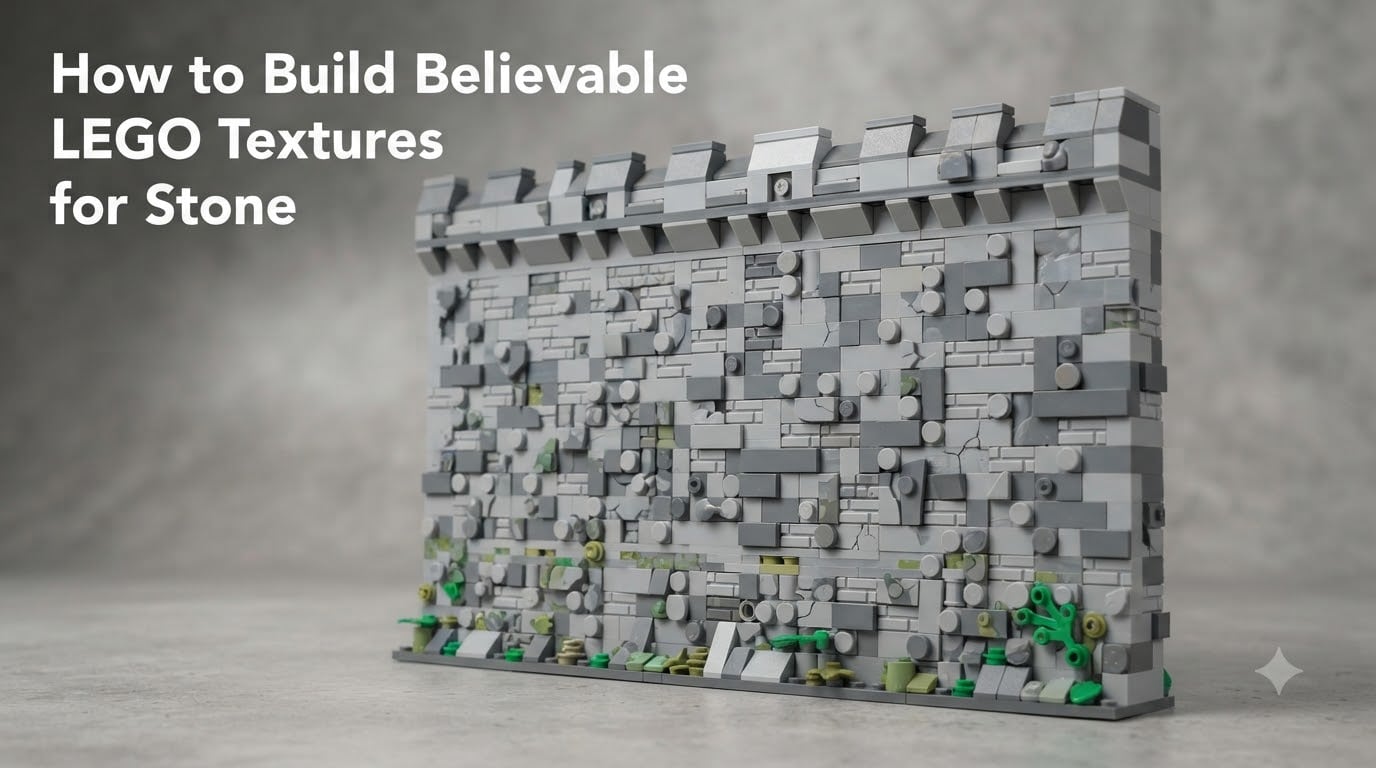
If you’ve ever built a LEGO castle and felt the walls looked too flat, too plastic, or just plain boring, the problem wasn’t your bricks. It was your texture. Great LEGO texture building turns a stack of grey rectangles into a believable medieval ruin, a crumbling fortress, or a mossy stone cottage. I’ve spent years refining stone walls for my own MOCs, and the techniques I’m sharing here are the same ones thebrickfantastic community relies on for competition builds.
By the end of this guide, you’ll understand why texture matters, which techniques work for stone specifically, and how to combine them so your walls look like they were carved from real rock rather than assembled from a kit. We’ll start with the basics and work up to advanced greebling, so beginners and seasoned builders both get something useful.
Table of Contents
Why Texture Matters in LEGO Stone Builds
Texture is what separates a LEGO model from a LEGO toy. A smooth wall of identical 2×4 bricks reads instantly as plastic, no matter how clever your color choices are. Once you break up that surface with offset rows, side-studded bricks, and small protruding pieces, the eye sees depth and weathering. The brain believes it’s looking at stone.
Real stone walls aren’t uniform. Stones vary in size, sit at slightly different depths, and have chipped edges. LEGO texture building mimics that irregularity using techniques that shift bricks by half-stud intervals, expose stud sides, and add small details between courses. The result is a wall that feels ancient and weighty, even though it’s built from the same pieces you used as a kid.
Texture also solves a practical problem. Without it, two adjacent LEGO walls of the same color blend into a single block. Texture breaks the plane so each section reads as a distinct surface. This matters hugely for medieval LEGO castle walls, ruins, and cottages where the visual separation between floors, buttresses, and roofs is what sells the architecture.
The Basic Stacking Technique for Stone Walls
The simplest LEGO texture building technique is also the most important to master first. You stack 2×4 or 1×2 bricks in a running bond pattern, offsetting each row by half a brick so the vertical joints don’t line up. This is the foundation of every stone wall you’ll ever build.
For a believable stone look, start with three shades of grey: dark bluish grey, light bluish grey, and medium stone grey. Mix them in roughly 60/30/10 proportions, with the dominant color forming the bulk of the wall and the secondary colors breaking up the field. Avoid perfect patterns. Random distribution looks more natural than stripes or checkerboards.
- Lay your first course of 2×4 bricks in a single color, usually the darkest grey.
- Start the second course with a 1×2 brick instead of a 2×4, creating an automatic half-brick offset.
- Continue alternating courses, mixing in 1×1 bricks and 1×2 plates for variation.
- Insert a 1×1 round plate or 1×1 brick with side stud every 4-6 bricks to add texture.
- Repeat this pattern for the height of your wall, varying colors as you go.
Even at this basic level, two small changes make a huge difference. First, don’t align bricks by studs across courses. Instead, build every other course in the opposite direction so the side studs catch the light differently. Second, replace one out of every ten bricks with a 1×1 round plate. The smooth stud breaks the regular grid and hints at a worn stone surface.
SNOT Technique: Building Studs-Not-On-Top for Texture Variation
SNOT stands for Studs Not On Top, and it’s the single most powerful LEGO texture building technique for stone. Instead of building upward with studs visible, you orient bricks sideways or upside-down so the studs face outward. This lets you attach additional pieces to the visible surface, creating protrusions, gaps, and irregular contours that look like chipped stone.
The most common SNOT method for stone walls uses plates with side studs. A 1×2 plate with a single side stud, or a 1×1 brick with a stud on one side, lets you attach small pieces perpendicular to the wall. Used in a running bond, these create a wall where every other stone has a small bump or notch. From a distance, it reads as weathered rock.
To build a SNOT stone wall, follow these steps:
- Build a back wall using standard studs-up bricks in your base grey color.
- Attach 1×2 plates with side studs to the front of this back wall, spaced every 2-3 studs.
- Add 1×1 round plates or 1×1 bricks with side studs to these side-mounted plates.
- Fill the gaps between protruding pieces with tiles in slightly different greys to create flat stone faces.
- Layer smaller pieces like 1×1 cones or 1×1 cylinders in select spots for added rock-like jaggedness.
Geneva Durand’s stone wall builds are a great reference for SNOT done well. She uses a mix of side-studded plates and 1×1 round plates to create walls that look hand-carved. The key is restraint. Add too many SNOT protrusions and the wall looks busy. Aim for two or three small pieces per row, not five or six.
Mixing Brick Types and Colors for Realistic Stone
Real stone isn’t one color, and your LEGO walls shouldn’t be either. Even within a single grey family, varying the brick types creates depth. Combine 2×4 bricks with 1×2 bricks, 1×1 bricks, and 1×2 plates in the same wall. The eye picks up the size variation before it consciously registers the colors, and the result feels organic.
Color mixing is where many builders go wrong. They use three greys but distribute them in obvious patterns like alternating rows or alternating bricks. Real stone fields have clumps of similar color. A few darker stones clustered together, a pocket of lighter stones, and then mostly mid-tone. To copy this, drop your bricks into a pile and pick them randomly rather than sorting them first.
Three additional color principles help sell the stone look. First, use warm tones sparingly. A few tan or dark tan bricks in a grey wall suggest old mortar or sandstone inclusions. Second, add a tiny amount of black. One black 1×1 brick per 50 grey ones creates depth without darkening the whole wall. Third, consider your lighting. Under warm lights, cool greys can look flat. A few dark stone grey pieces add contrast that holds up under any lighting.
Using Jumper Plates and the Offset Technique for Depth
Jumper plates are plates with a single centered stud, and they’re the secret to creating three-dimensional depth on a flat LEGO wall. A standard plate takes up a full stud. A jumper plate lets you offset a piece by half a stud, breaking the rigid grid that gives away LEGO walls as LEGO walls.
The classic offset technique works like this. Build a course of bricks as normal, then place jumper plates on top. Add the next course shifted by half a stud. The result is a wall where every other row juts out slightly, catching light and shadow differently. From a few feet away, the wall looks like it has rounded stones rather than rectangular blocks.
For best results, alternate which direction you offset. If you shift one row forward, shift the next row backward. This creates a subtle zig-zag of depth that mimics how real stone walls settle over time. You can also use 1×2 jumper plates to offset specific rows by full stud widths, creating larger ledges or breaks in the wall. This works especially well for ruined or partially collapsed stone sections.
Adding Clips, Bars, and Unusual Pieces for Stone Texture
Clips and bars are usually thought of as functional pieces, but they’re also powerful texture tools. A clip or bar attached to a wall surface creates a small protrusion that catches light and breaks the flat plane. More importantly, you can attach other pieces to the clip, building outward in any direction. This is the essence of greebling, and it works beautifully for stone.
For stone walls, my favorite unusual pieces are 1×1 modified bricks with side studs, 1×1 cones, 1×1 round plates, and small clips. I scatter these between courses of regular bricks, sometimes 3-4 pieces per row, sometimes just one. The randomness is what sells it. A wall with perfectly distributed texture looks designed. A wall with random texture looks eroded.
Bars are especially useful for ancient stone work. A 1×4 bar attached horizontally across several bricks creates a lintel-like detail that suggests reinforced masonry. Vertical bars can suggest rebar or wooden beams inside a stone wall. Builders like the team at Bricknerd have used clip-and-bar combinations to create gravity-defying stone details that don’t look like they should hold together, but do because the underlying structure is solid.
Cheese Slopes and Round Pieces for Natural Stone Effects
Cheese slopes are the sloped 1×1, 1×2, and 1×3 pieces with a smooth angled face. They’re named for their triangular cross-section, which resembles a wedge of cheese. In LEGO texture building, cheese slopes are essential for stone walls because they create chamfered edges that mimic how real stones wear down over centuries.
Place cheese slopes along the top edge of a wall to suggest a worn coping stone. Insert them at the corners of individual bricks to create chipped edges. Use them in clusters at the base of a wall where the heaviest weathering would occur. A 1×1 cheese slope in a slightly different grey from the surrounding brick stands out just enough to suggest a stone that has been worn by traffic or water.
Round plates and round bricks are the other essential tool for stone. A 1×1 round plate embedded in a wall of square bricks immediately reads as a pebble or knot in the stone. Use them sparingly. One every 8-10 studs is plenty. Too many and the wall looks polka-dotted. The goal is suggestion, not pattern. Round 1×1 bricks work even better for rocky mountain textures because they catch light on their curved surfaces.
Weathering Techniques: Mossy Greens and Aged Grays
Stone doesn’t stay grey forever. Real stone accumulates moss, lichen, water stains, and dirt. To make your LEGO walls look aged rather than brand-new, you need to add color variation that suggests weathering. The most common technique is introducing small amounts of green into the grey palette.
Olive green and dark green pieces, used sparingly, suggest moss. Drop a few 1×1 green plates or round plates into the lower courses of your wall, where moss would naturally grow. Concentrate them at the base and in corners where water would collect. Avoid bright green. Aged moss is olive or dark green, not the saturated green of fresh grass.
Brown and tan pieces suggest dirt or sandstone inclusions. A few dark brown 1×1 bricks in a grey wall can imply old wooden beams or rusted iron. Tan pieces can suggest sand or limestone pockets. Use these even more sparingly than greens, perhaps one or two per square foot of wall. The goal is hint, not display.
For more advanced weathering, consider using medium nougat or dark tan pieces to suggest sandstone intrusions. A medieval LEGO castle wall with a few sandstone-colored stones looks far more realistic than a wall of uniform grey. Builders in the RebelLUG community have used this technique to stunning effect in castle collabs, mixing real-world masonry patterns into their builds.
Advanced Greebling for Medieval Castles and Ruins
Greebling is the practice of adding many small, varied details to a surface to create complexity. In LEGO texture building, greebling is what turns a simple stone wall into a medieval fortress. The technique combines everything we’ve discussed: SNOT, jumper plates, clips, cheese slopes, round pieces, and color variation, all layered together.
A good medieval castle wall might include battlements built from 1×2 plates with side studs, protruding arrow loops made from 1×1 round plates, and irregular stone faces created by mixing 1×1, 1×2, and 1×3 bricks. The wall doesn’t follow a single pattern. It has clusters of dense texture and clusters of relative calm, just like real aged masonry.
For ruins, push the techniques further. Build a partial wall that ends abruptly, with broken edges made from cheese slopes and 1×1 plates. Use offset rows to suggest stones that have shifted over time. Add a few pieces of “rubble” at the base, built from 1×1 bricks and plates in mixed greys. The eye fills in the implied destruction, and the wall tells a story.
Stop adding texture before you think you’re done. A common mistake is over-greebling. Build the wall, set it on a shelf, and look at it from across the room. If any single area catches your eye because it’s too busy, remove a few pieces. The best stone walls reward a second look, not a first look. They feel rich without feeling cluttered.
Diagonal Cracks and Non-Rectangular Stone Shapes
Most LEGO walls are built on a 90-degree grid, but stone walls in nature rarely follow such a strict pattern. To break the grid, use diagonal combinations of cheese slopes and wedges. A 1×1 cheese slope placed diagonally against a regular brick creates a 45-degree break in the wall. Stack several of these in a row and you’ve created a crack or fissure.
This technique works especially well for fantasy or ruined stones. Loft-style buildings, elven temples, and ancient ruins often have organic, irregular shapes. By mixing in slope wedges and corner pieces, you can break out of the rectangular grid entirely. Build a wall that curves, tilts, or narrows as it rises. The texture reads as ancient and mysterious.
For curved walls, round plates work wonders. Build a square wall section, then add round plates around the perimeter to soften the edges. The eye reads this as a worn stone structure rather than a sharp modern corner. Combine with cheese slopes at the top edge for a full transition from sharp to soft, mimicking how stone weathers from crisp edges to rounded curves over centuries.
Frequently Asked Questions
How do you create stone texture with LEGO?
The most effective way to create stone texture with LEGO is to use the SNOT technique (Studs Not On Top), which lets you attach side-studded plates and bricks to expose studs in multiple directions. Combine this with mixed grey colors, offset rows using jumper plates, and small details like 1×1 round plates to mimic weathered, irregular stone surfaces.
What is the SNOT technique in LEGO building?
SNOT stands for Studs Not On Top. It’s a building orientation where bricks are placed sideways or upside-down so their studs face outward instead of up. This allows you to attach additional pieces perpendicular to the wall surface, creating texture, depth, and irregular details that aren’t possible with standard studs-up construction.
How do you make LEGO walls look weathered and old?
To make LEGO walls look weathered, introduce small amounts of olive green and dark green pieces to suggest moss, especially in lower courses and corners. Add tan or dark tan pieces sparingly for sandstone inclusions. Mix dark bluish grey, light bluish grey, and medium stone grey in irregular clumps rather than even patterns. Use cheese slopes on top edges to suggest worn coping stones.
Which LEGO pieces are best for realistic stone texture?
The best LEGO pieces for stone texture include 1×1 round plates, 1×1 bricks with side studs, 1×1 cheese slopes, 1×2 plates with side studs, 1×1 cones, and small clips and bars. Round plates suggest pebbles or knots in the stone, cheese slopes suggest worn corners, and side-studded pieces let you build SNOT textures. Combine these with standard bricks in three shades of grey.
How do you build medieval LEGO castle walls?
Build medieval LEGO castle walls by layering multiple techniques: SNOT for battlements and arrow loops, offset rows using jumper plates for depth, mixed greys for stone realism, and small greebling pieces for weathered details. Add battlements from 1×2 plates with side studs, use cheese slopes for worn coping stones, and scatter round plates across the surface for irregular stone faces.
Putting It All Together for Believable LEGO Stone Builds
LEGO texture building is one of those skills that pays off for years. Once you understand how SNOT, jumper plate offsets, mixed greys, and small greebling pieces work together, every medieval build you tackle afterward will look more believable. Start with the basic stacking technique, add SNOT and offset rows as you gain confidence, and layer in weathering and greebling for advanced builds.
The real secret is restraint. Texture is suggestion, not statement. The best stone walls feel ancient and weighty because the details are subtle, not because they’re overwhelming. Build, step back, look from across the room, and remove anything that shouts too loud. Your medieval LEGO castle walls, ruins, and cottages will thank you for it.