
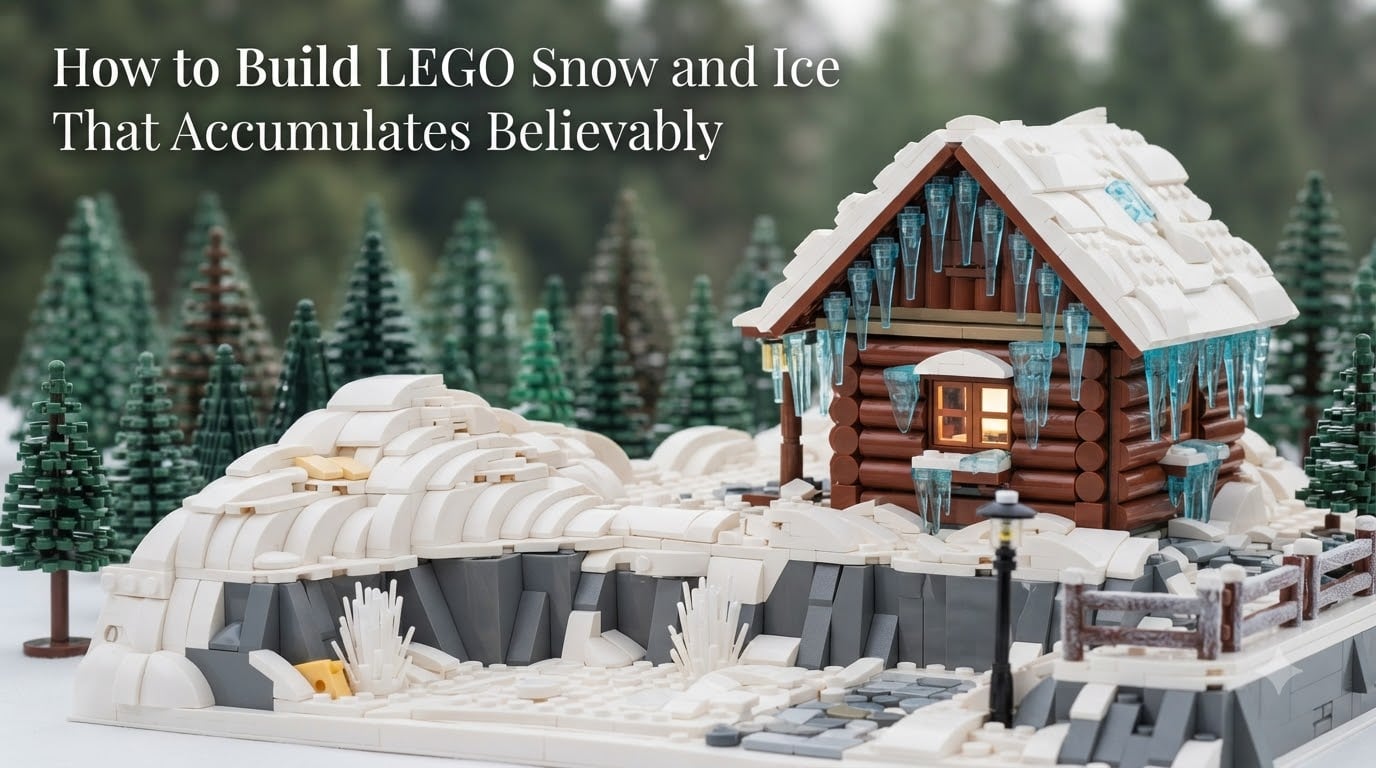
I love winter-themed LEGO builds, but for years my snow looked like white Lego stacks glued together, not snow at all. After two rebuilds and roughly 30 hours of trial and error, I figured out a small set of techniques that turn flat white bases into believable drifts. This guide walks through how to build LEGO snow and ice that accumulates believably, with the same parts list, steps, and mistakes I’d avoid if I were starting today.
If you build winter villages, mountain MOCs, or snowy dioramas, the methods below will help your snow look like it actually fell and settled on the landscape.
Table of Contents
How to Build LEGO Snow and Ice That Accumulates Believably
Building believable LEGO snow and ice comes down to three things: stepped slopes for drifts, overhanging plates for accumulation on edges, and a textured mix of white parts to break up flat areas. Use white slopes stepped at half-stud offsets to form convex drifts, layer 1×1 round plates and jumper plates on top of drifts for natural edges, and combine transparent light blue elements for ice that looks frozen, not plastic.
Essential Parts for LEGO Snow Builds
Before you start building, gather the parts that make snow look organic instead of rectangular. Most of these are common LEGO pieces, so you probably already have most in your collection.
For snow drifts and accumulation, you will need:
White slopes – 2×1, 3×1, 4×1 in 33 and 45 degree angles for shaping drifts
White curved slopes – for natural rolling edges where drifts meet the ground
White wedge slopes – to taper snow down to ground level
White jumper plates – 1×2 and 1×3 for adding bumps on flat areas
White 1×1 round plates – to soften edges and add subtle texture
White tiles – for the smooth surfaces between drifts
Tooth plates and horizontal tooth plates – for jagged accumulation details
For ice accumulation, add transparent light blue and transparent blue slopes, plates, and 1×1 round tiles. Bar elements work well for icicles hanging off eaves and ledges.
Technique 1: Slope-Based Snow Drifts
Slopes are the backbone of any believable LEGO snow build. They let you break out of the rigid grid and shape snow into rounded drifts that read as natural.
Start with a row of white plates laid flat as the ground level. Place a row of 2×1 or 3×1 slopes on top, oriented so the high end faces inward. Step each subsequent row back by half a stud so the slope profile rises gradually rather than in a straight wall.
Use curved slopes where the drift needs to wrap around a corner or feature. Curved slopes are your best friend for the rolling edges where snow meets a path or rock.
Finish the drift by tapering down with wedge slopes until the snow meets the ground plates again. The goal is to never have a sharp vertical edge – real snow piles up and tapers out, and yours should too.
Technique 2: Overhanging Snow on Rockwork
Overhanging snow is the detail that takes a build from good to great. It sells the idea that snow settled on top of an object and is hanging on by friction, just like in real life.
Build your rockwork, ledge, or wall first in dark gray or brown. On top of that ledge, lay a row of white plates that extends one stud past the edge of the rockwork. Below that overhang, attach 1×1 white round plates upside down at irregular intervals to suggest clumps of snow pulling away from the edge.
This trick works because real snow does not stop in a clean line at the edge of a surface – it spills over. The 1×1 round plates give you those irregular clumps without committing to a solid overhang that would look fake.
For deeper overhangs, layer two or three rows of plates sticking out past the rockwork. Add a few tooth plates pointing down for jagged icicle-like accumulation. This is also where you can blend in transparent light blue elements for ice edges, which I cover in more detail below.
Technique 3: Texturing Flat Snow Areas
Flat white areas are where most LEGO snow builds fall apart. A smooth white plate looks like a piece of plastic, not a snow field. You fix this by breaking the surface up.
Drop white jumper plates onto the flat surface at irregular intervals. Jumper plates stick up one plate height, so they read as small bumps and divots in the snow. Combine them with 1×1 round plates placed at random spots for softer raised points.
Add tooth plates and horizontal tooth plates along the edges where snow meets a feature, like a fence post or tree trunk. These give the impression of snow clinging to the object.
Try to scatter these texture pieces in clusters rather than evenly. Real snow accumulates in clumps, not in a perfect pattern, so uneven distribution reads as natural.
How to Build LEGO Ice Accumulation
No top competitor covers ice, so this is your chance to stand out. Ice uses many of the same techniques as snow but relies on transparent and translucent parts for the right effect.
For frozen ponds and icy patches, lay transparent light blue plates flat on dark gray ground plates. The transparency lets the dark color show through, which reads as depth and water. Add a few white 1×1 round plates on top for snow that has settled on the ice.
For icicles, attach transparent light blue or transparent blue 1×1 round plates and bar elements to the underside of eaves, branches, and cliffs. Vary the length from one to four studs. Mix in a few white 1×1 round plates so some icicles look half-covered in snow.
For ice accumulation on rockwork, layer transparent blue slopes on top of dark gray slopes. The transition from gray rock to blue ice to white snow on top is one of the most convincing combos in winter MOCs.
I learned this the hard way – my first ice attempts used solid blue plates, which looked like painted plastic. Switching to transparent parts was the difference between toy ice and believable ice.
The LEGO 5-2 Rule for Natural Snow Shapes
The LEGO 5-2 rule says that for organic builds, no two adjacent studs in the same row should be more than 5 base units apart or closer than 2 base units together without a transition piece. For snow, this rule keeps your drifts from looking too uniform.
In practice, when you place a row of slopes, do not let five slopes line up perfectly in a row before you break the pattern with a tile, jumper plate, or change in direction. The eye picks up long straight runs as artificial, even when they are slopes instead of plates.
Applying the 5-2 rule is one of the quickest ways to make a snow drift look like it grew naturally instead of being assembled.
Color Variations for Realistic Snow
Pure white snow is a myth outside of fresh powder. Real snow shades into light bluish gray, tan near dirt, and very light blue in shadow. Mixing these in sparingly takes your build from cartoon to believable.
Use light bluish gray for shaded areas where drifts curl under themselves. Add a small amount of tan or brown 1×1 round plates where snow meets a dirt path or road. For melted snow patches, swap a few white tiles for very light blue tiles.
Keep these accents under 10 percent of your snow volume. Too much gray and your snow looks dirty. Too much blue and your snow looks like ice. White still dominates, with the other shades playing a supporting role.
Common Mistakes to Avoid
Most of the forum complaints I read match the same three mistakes. Avoid these and your build will already be ahead of most.
Building snow on a flat rectangular base. Snow does not pile up in clean rectangles. Always start your snow base from an irregular shape and let the snow extend past your rockwork or ground plates in uneven clumps.
Using only one slope angle. Mixing 33 degree and 45 degree slopes in the same drift gives the variation your eye needs to read it as natural. Sticking to one angle creates a repeating pattern that looks mechanical.
Skipping texture on flat areas. A solid white plate section will kill the realism of your build no matter how good the drifts are. Always add jumper plates, round plates, or tiles at the transition points.
Using solid blue for ice. Solid blue plastic looks like a blue LEGO piece, not ice. Switch to transparent light blue or transparent blue, and let a darker color show through underneath.
Tips for Winter Village and Diorama Scenes
When you are building a wider scene, work from the back forward. Build the mountain or background drifts first, then the midground snow field, then the foreground path. This keeps you from trapping yourself with no room to add a back drift later.
Leave gaps in your snow for chimneys, paths, and clearings. Snow that covers everything reads as unrealistic fast. Use dark gray or brown plates to mark cleared paths and road edges.
Add a few evergreen trees with white tips. They break up large snow fields and give the eye something to anchor on. You can find winter tree parts in official sets like the Winter Village series, or build your own from green slopes and white tooth plates.
Finally, photograph your build under soft natural light if you can. Harsh light flattens the subtle texture work you just spent hours adding. Soft window light brings out the shadows in your drifts.
FAQs
What is the LEGO 5-2 rule?
The LEGO 5-2 rule states that no two adjacent studs in the same row should be more than 5 base units apart or closer than 2 base units together without a transition piece. For snow builds, this prevents long straight runs of slopes that read as artificial.
How to make a LEGO snowball?
Stack three or four white 1×1 round plates on top of each other, then add a white 1×1 round tile on top. For a dirty snowball, swap one of the outer plates for a tan 1×1 round plate.
How to make LEGO ice?
Use transparent light blue or transparent blue plates, slopes, and 1×1 round tiles over a dark gray base. Avoid solid blue parts, which look like plastic instead of ice. Add transparent bar elements hanging from eaves for icicles.
How do I make snow look natural in my LEGO builds?
Use a mix of slopes, curved slopes, and wedge slopes stepped at half-stud offsets. Break up flat areas with jumper plates, 1×1 round plates, and tooth plates. Avoid rectangular bases and stick to one slope angle.
Can I use fake snow materials with LEGO?
Yes. Fake snow flock or textured powders can be applied to LEGO bases with white glue or PVA for background effects. Avoid getting fake snow on stud surfaces where you still need to attach bricks, since the texture interferes with clutch power.
Conclusion
Building believable LEGO snow and ice comes down to slopes stepped at offsets, overhanging plates on rockwork, scattered jumper plates for texture, and transparent blue parts for ice. Start with one drift, practice the techniques above, and your winter village will look like snow actually fell on it.
Pick up the parts on the parts list, build a small test scene, and try one of the techniques this week. Once you see the difference in person, the rest of the build follows naturally.