
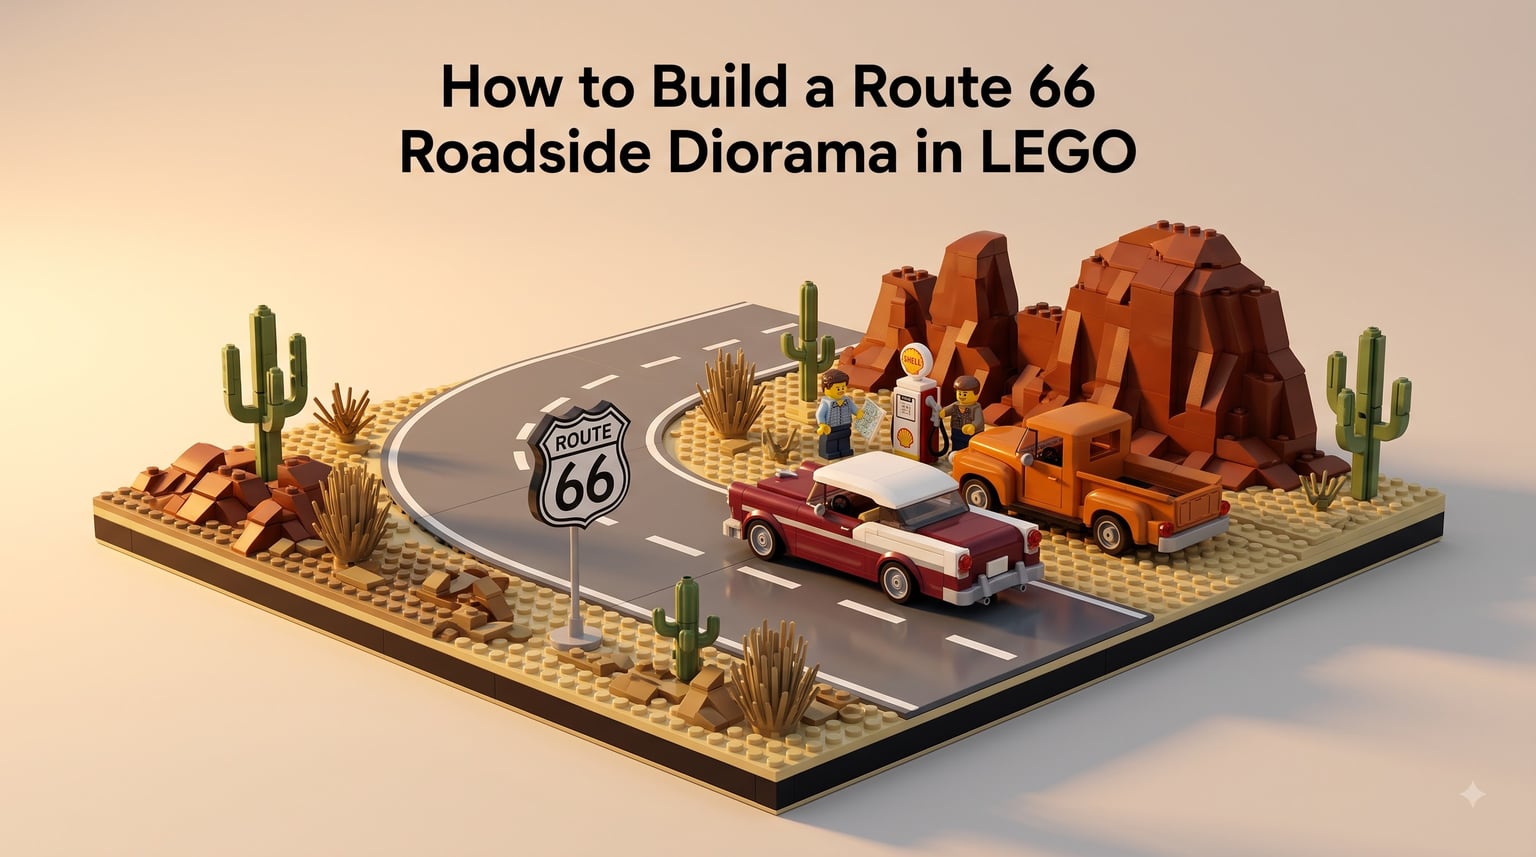
Route 66 is the most photographed highway in American folklore, and turning it into a LEGO diorama is one of my favorite weekend builds. I have been collecting Americana MOCs for years, and after watching the Route 66 LEGO Ideas project gain traction on Reddit, I decided to write the complete text guide I wish I had when I started.
This guide shows you how to build a Route 66 roadside diorama in LEGO from scratch, covering every stage from the base plate all the way to the smallest greebling details. I have included a parts list, scale notes, and the exact 5:2 rule I use for diagonal roads so your build does not end up with awkward gaps.
Table of Contents
What You Will Learn in This Route 66 Diorama Guide
This tutorial walks through seven complete build phases plus an FAQ at the end. By the time you finish reading, you will know how to plan, structure, and detail a believable Route 66 scene.
Selecting the right base plate, size, and shape for your display space
Layering desert terrain with plate techniques that hold their shape
Building realistic roads using the 5:2 rule for diagonals
Constructing an authentic black-and-white Route 66 shield sign
Adding classic vehicles with hidden ball-joint attachments
Greebling your build with SNOT techniques for surfaces without visible studs
Installing subtle lighting without exposing wires
Parts and Materials Checklist
Before you start building, gather your bricks. I have split this list into must-have categories and nice-to-have categories so you can begin even if your collection is small.
Must-Have Parts
These pieces appear in every Route 66 diorama I have built. Aim for the counts shown, but substitute freely if your collection runs short.
Base plates: 1 large 32×32 or 48×48, plus 2-4 smaller 16×16 plates for layering
Dark tan and sand yellow plates and bricks (roughly 200 pieces combined) for the desert floor
Dark gray tiles and 1×2 plates (about 60 pieces) for the road surface
White tiles (around 20 pieces) for road center stripes and shield lettering
Black 1×1 plates, tiles, and round bricks (about 30 pieces) for shield details and tires
Reddish brown bricks and slopes (about 40 pieces) for rock formations
Sand green plates and slopes (about 25 pieces) for cacti and desert shrubs
Nice-to-Have Details
These pieces elevate the build from good to great. Skip them on your first pass and add them later if you want.
Light bricks or third-party LED string lights
Minifigure scale classic cars (Crocodile Car, VW Beetle, or Cadillac molds)
Minifigures in 1950s outfits (cowboy hat, diner waitress, mechanic)
Small transparent pieces for windows and headlights
Grille plates and 1×2 tiles for car detailing
Helpful Tools
You will also want a brick separator, a clean flat surface, and good lighting. A small pair of tweezers helps when placing 1×1 tiles for road stripes.
Choosing Your Diorama Base
The base is the foundation of your entire build, so it deserves careful thought. Most LEGO Route 66 dioramas use either a circular or rectangular base, and each has trade-offs.
A circular base looks more compact and works beautifully for a single roadside scene. It is the shape used in the popular Route 66 LEGO Ideas submission. A rectangular base, on the other hand, gives you room for a longer stretch of highway with multiple landmarks.
For your first build, I recommend a 32×32 stud base plate. It is large enough to fit a road curve, a service station, two vehicles, and a sign without feeling cramped. If you have the shelf space, go up to a 48×48 for a more cinematic scene.
Whichever size you pick, make sure the base plate sits flat on your display surface. A warped plate will crack your terrain later when you stack bricks.
How to Build a Route 66 Roadside Diorama in LEGO: Step by Step
This is the core tutorial. I have broken the build into seven numbered steps. Follow them in order and you will end up with a finished diorama at the end of a weekend.
Step 1: Prepare Your Workspace and Base Plate
Lay out your base plate on a flat table with at least two feet of clearance on every side. Sort your dark tan, sand yellow, and dark gray bricks into shallow trays so you can grab them quickly. This setup step saves hours later.
Step 2: Lay the Desert Floor
Cover the base plate with a single layer of dark tan plates. Mix in roughly 20 percent sand yellow plates in irregular patches to break up the uniformity. Real desert landscapes are never a single color, so the variation matters.
Step 3: Build the Terrain Layer
Add a second layer of bricks in select areas to create gentle hills and dips. Use reddish brown for rocky outcroppings and sand green for low shrubs. Keep elevations to no more than 4-6 bricks tall so the scene stays readable.
Step 4: Construct the Road
Lay dark gray tiles for the road surface in a curve that crosses the base plate. Use the 5:2 rule for any diagonal segments (more on that below). Add white 1×1 tiles in a dashed line down the center for the classic Route 66 road marking.
Step 5: Build the Route 66 Shield Sign
Construct the iconic shield using black and white pieces only. The historic Route 66 shield is black and white, not the red and blue you sometimes see in stylized versions. Stack black plates to form the shield outline and use white tiles for the “66” numerals.
Step 6: Add Vehicles and Minifigures
Place two classic American cars on the road: a 1950s sedan and a pickup truck. Position minifigures nearby to suggest a story, perhaps one fueling up at a small pump and another waving from a parked car.
Step 7: Detail with Greebling and Lighting
Finish the build with SNOT details on the buildings, small props like gas pumps and mailboxes, and optional lighting strips behind the sign. Step back every 15 minutes to review your progress at a distance.
Road Creation and Markings
The road is the visual spine of your diorama, so getting it right matters more than almost any other element. I use the 5:2 rule for every diagonal road I build, and it has never failed me.
The 5:2 rule means that for every five studs you advance along the road’s direction, you shift the road two studs to the side. This produces a smooth 21.8-degree angle that looks natural and aligns cleanly with the LEGO grid. Apply this rule when your road needs to curve or when you want to suggest the road disappearing into the distance.
For the road surface itself, lay dark gray tiles in a single layer. Tiles look smoother than plates and read better at a distance. If your road needs to rise over a hill, switch to plates so you can stack the elevation in clean brick-height increments.
For center stripes, I use white 1×1 tiles placed two studs apart. This gap mimics real highway dash spacing and looks correct at minifigure scale. Avoid white plates for stripes because they look chunky compared to tiles.
Road edges benefit from a single row of dark gray 1×1 round plates or tiles. This subtle border suggests a curb without adding bulk to the build.
Building the Route 66 Shield Sign
The Route 66 shield is the most recognizable element of the entire diorama, and getting the colors right is critical. The historic shield is black and white, full stop. Many beginners reach for red and blue pieces because modern highway shields use those colors, but Route 66 predates that system and must remain black and white to read correctly.
Build the shield shape first using black 1×1 plates stacked three layers tall on a 6×6 footprint. Slope the top corners using black 1×1 slopes so the shield shape tapers correctly. The bottom point should be one stud wide, formed by a single black plate.
For the “66” numerals, use white 1×1 tiles arranged in the classic number shapes. The first 6 needs six tiles (a vertical column, a top arc, a middle arc, and a bottom arc). The second 6 mirrors the first. Use a printed tile if you have one, otherwise build the numbers manually.
Mount the finished shield on a black 1×2 brick post at least six bricks tall. Position the sign where it frames the road without blocking it. A common mistake is placing the sign in the middle of the road; it belongs on the shoulder.
Desert Landscape and Terrain
A flat desert looks fake, so your terrain needs subtle elevation changes. I use a layered plate technique where each layer adds only one brick of height, then I taper the edges with slopes to avoid visible stud lines on the sides.
For rocky outcroppings, reddish brown slopes stacked at angles create believable erosion shapes. Combine 1×2 and 1×3 slopes in different orientations to break up the symmetry. A few sand green 1×1 plates tucked between the rocks suggest desert lichen.
Cacti are surprisingly simple to build. A 2×2 sand green brick forms the body, with two 1×1 round plates sticking out as arms. Add a single yellow tile on top for a flower if you want a seasonal touch.
For dust and sand drifts, scatter sand yellow 1×1 round plates along the road edge. They catch the eye and suggest wind movement. Do not overdo it; three to five small drifts per scene is plenty.
Adding Vehicles and Minifigures
Vehicles bring your diorama to life, but they need to look attached to the scene rather than dropped on top of it. The classic trick is the ball joint technique, which I borrowed from Technic builders and adapted for System scale.
To use the ball joint technique, hide a black ball joint under the vehicle’s chassis with only the connecting stud visible. Press the stud into a base plate hole covered by a desert terrain tile. The vehicle looks like it is parked naturally, but you can lift it off whenever you want.
For the cars themselves, the Crocodile Car, VW Beetle, and old Cadillac molds all fit the 1950s-60s Route 66 vibe. If you do not have those specific molds, any 4-wide car with curved fenders will work. Add chrome details with 1×1 tiles in light gray.
Minifigures should be placed in groups of two or three, never alone. A lone figure looks stranded. Pairs suggest conversation and add storytelling. Position them at obvious interaction points: the gas pump, the diner counter, the driver’s seat of a parked car.
Greebling and Detailing Techniques
Greebling means adding small mechanical-looking details that make a scene feel lived-in. The SNOT technique (Studs Not On Top) is the foundation of greebling because it lets you build surfaces without visible studs facing the viewer.
To use SNOT, attach plates sideways using clip plates or headlight bricks. The studs then face outward, and you can stack more plates in any direction. This is how you build smooth gas station walls, diner facades, and road signs.
For small props, scatter these elements: a mailbox made from a 1×1 red brick on a black 1×1 plate, a fuel pump from a gray 2×2 brick with a black hose, and a wooden signpost from brown 1×1 bricks with white tile text.
Resist the urge to detail every square inch. Greebling works best when it is concentrated in two or three areas, leaving negative space for the eye to rest.
Lighting Your Diorama
Lighting is optional but transforms a daytime scene into a moody sunset. I use either official LEGO light bricks or thin third-party LED strips, depending on the project.
For a simple approach, slip a single white light brick behind the Route 66 shield so the sign glows like a backlit billboard. Hide the brick inside a small structure built from black bricks so it looks intentional.
For a fuller effect, run a thin LED strip along the back edge of the base plate and angle it toward the scene. Tuck the wiring into a groove cut into the base plate rim. Most builders never see the wires once the strip is in place.
Display and Finishing Tips
Once your diorama is finished, protect it from dust and rough handling. A clear acrylic display case from a local frame shop costs little and prevents accidental damage.
For photography, shoot your build near a window with indirect daylight. Avoid flash, which creates harsh reflections on the bricks. A small piece of black poster board behind the scene improves contrast and makes colors pop.
If you plan to share your build online, photograph it from three angles: front, three-quarter, and overhead. Overhead shots reveal terrain work that gets lost at ground level.
FAQs
What is the 5/2 rule in LEGO building?
The 5/2 rule means you advance five studs along a road while shifting two studs sideways, producing a 21.8-degree angle that looks natural and aligns cleanly with the LEGO grid.
How do I make a Route 66 sign in LEGO?
Build the shield from black plates and slopes in a 6×6 footprint, then add white 1×1 tiles for the 66 numerals. The shield must stay black and white because that is the historic Route 66 design.
What is the best base size for a LEGO diorama?
A 32×32 stud base plate is ideal for beginners. It fits a road curve, a sign, and two vehicles without feeling cramped. Go up to 48×48 if your shelf space allows.
What scale should I use for minifigures in a diorama?
Standard minifigure scale is 1:40 to 1:48 for buildings, 1:42 for vehicles, and 1:35 for figures. Match your car, building, and figure scales so nothing looks oversized or shrunken.
How do I create realistic desert terrain in LEGO?
Layer dark tan and sand yellow plates in irregular patches, then add reddish brown slopes for rocks and sand green 1×1 bricks for cacti. Keep elevations under six bricks so the scene stays readable.
Can I use third-party lighting in my LEGO diorama?
Yes. Thin LED strips work well for ambient lighting, and brick-sized LEDs fit behind signs. Hide all wires in grooves cut into the base plate rim so they stay invisible.
Conclusion
Building a Route 66 roadside diorama in LEGO is one of the most rewarding Americana projects you can tackle, and you now have the complete guide. From the parts list through the final lighting, you have every technique you need to bring that stretch of historic highway to life on your shelf. Start with the base, follow the seven steps, and remember to keep the shield black and white.
Once your first build is finished, consider submitting it to LEGO Ideas or sharing photos on r/lego. The community loves well-documented Route 66 MOCs, and your work might inspire the next official set.