
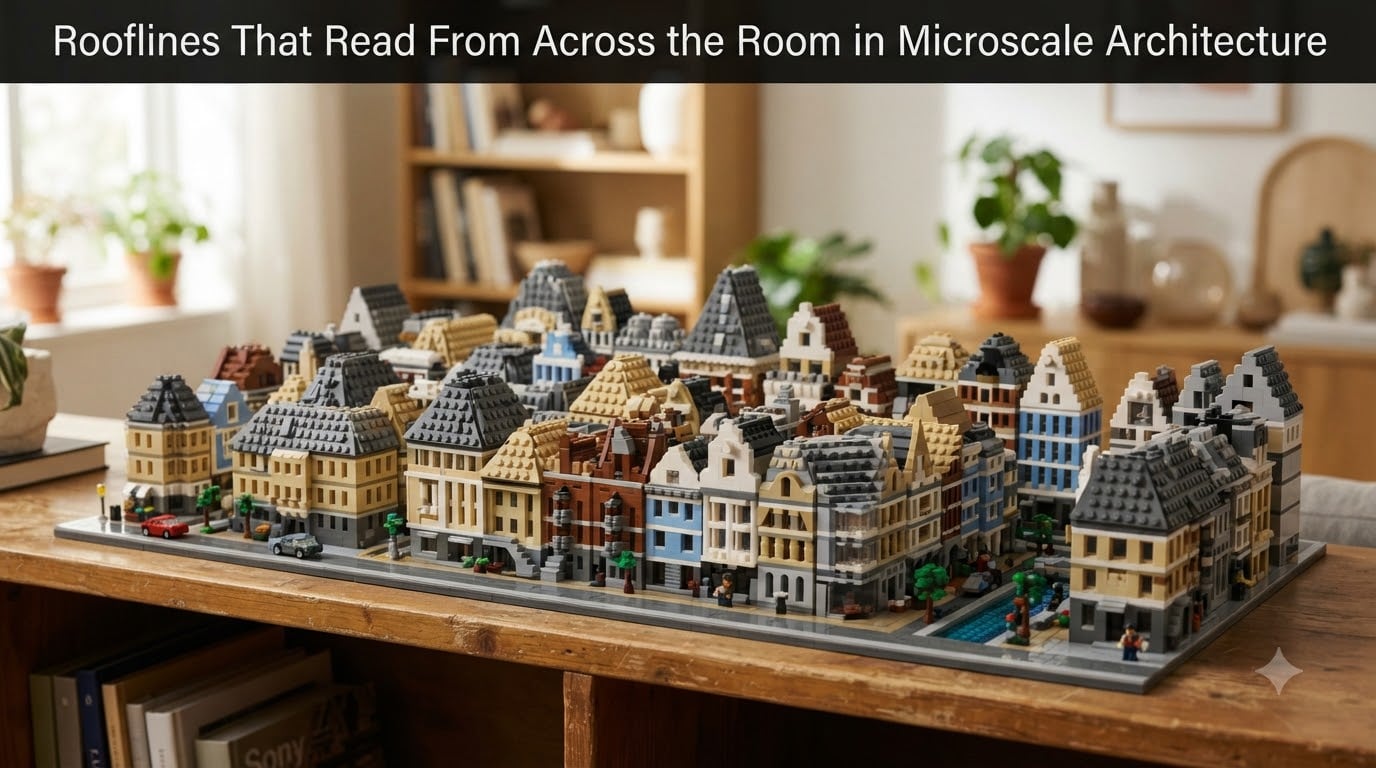
I built my first microscale city three years ago and spent an entire weekend on tiny rooflines that looked incredible under my desk lamp. Then I set the build on the shelf across the room and the rooflines vanished. The walls were still there, the windows still read, but the roof texture blurred into a flat gray smear. That moment is exactly why this guide exists. Microscale architecture rooflines need a different design mindset than minifig-scale building, and the difference comes down to how the human eye reads pattern at distance.
Most microscale tutorials teach you how to build a roof, but they do not teach you how to build one that reads from across the room. In this guide I will walk you through the scale math, the four visibility principles, the best piece types, and the step-by-step techniques I use on every microscale MOC that has to hold up at display distance. Whether you are building a micro cityscape, a tiny castle, or a single display model, the rules below will keep your rooflines sharp from ten feet away.
Table of Contents
What Is Microscale Architecture and Why Rooflines Matter
Microscale architecture in LEGO refers to building at a scale smaller than minifig-scale, where every plate counts and every stud carries weight. At microscale, a 1×1 brick might represent a full-sized structural beam, and a single cheese slope becomes a rooftop the size of a tennis court. The roofline is the silhouette where the walls meet the roof, and at microscale this silhouette is the single most important visual element on your build.
Rooflines matter because they give the eye an anchor. When you look at a real cityscape from across a park, the first thing you read is the roofline: gables, peaks, parapets, slopes. Windows, doors, and bricks all blur at distance, but the silhouette of the roof stays sharp because it contrasts against the sky. Microscale architecture works the same way. If your roofline disappears at viewing distance, your entire build loses its visual hook and starts looking like a stack of plates.
The reason microscale rooflines fail is simple physics. As viewing distance increases, the angular size of every piece shrinks. A 1×1 slope tile at two feet is a recognizable unit; at ten feet it is roughly one pixel wide. To survive that compression, your roofline pattern has to use larger, more contrasted shapes than your wall pattern. Walls can fade into brickwork; rooflines cannot.
Scale Ratio Fundamentals for Visibility
The 5/2 rule is the most common scale ratio in microscale architecture. It states that one stud on a minifig-scale wall equals roughly half a stud on a microscale wall. In practice, this means a microscale window might be a single 1×1 cheese slope, and a microscale roof tile might be a 2×2 plate covering what would be a four-foot section of real roof.
For visibility, you need to think in angular size rather than physical size. A standard rule I use on every build: any feature meant to read from ten feet should occupy at least three millimeters of real-world space at microscale. That translates to roughly one stud wide for a single roof peak, two studs for a row of tiles, and four studs for a major silhouette element like a chimney or gable end.
Viewing distance also changes how color and contrast behave. At ten feet, dark colors against light colors carry the silhouette; mid-tones against mid-tones disappear. I keep a small strip of 1×2 plates in dark red, dark green, black, and white on my desk for quick contrast checks. If a piece disappears against its neighbor at arm’s length, it will absolutely vanish at room distance.
Key Principles for Rooflines That Read From Across the Room
There are four core principles I follow on every microscale roofline that needs to hold up at viewing distance. None of them are complicated, but all four have to be working together for the effect to land.
Principle 1: Repetition beats detail. A single cheese slope is invisible at distance. Twelve cheese slopes in a tight row read as a clear roof texture. Repetition gives the eye a pattern it can latch onto even when each individual piece is too small to resolve. I aim for at least six to eight repeats of any roof unit before I add variations.
Principle 2: Contrast beats color. A dark gray roof on a light gray wall reads from across the room. A medium gray roof on a slightly different medium gray wall does not. Pick your roof color first by contrast against the wall, not by what looks attractive up close.
Principle 3: Silhouette beats surface. The outline of the roof against the sky matters more than the texture on the roof surface. A flat gray plate with a stepped outline reads better than a textured roof with a flat outline. Always check your build by squinting at it from ten feet, or by taking a phone photo and blurring it slightly.
Principle 4: Larger pieces at the peak. Pieces near the roof ridge should be visually heavier than pieces near the eaves. I often use a 1×2 slope at the peak and a 1×1 cheese slope at the edge. This creates a tapering weight that mimics real architecture and reinforces the silhouette.
Best Piece Types for Visible Rooflines at Microscale
Through dozens of microscale builds I have settled on a short list of piece types that consistently produce rooflines that read from across the room. These are not the only options, but they are the pieces I reach for first.
Cheese slopes. The 1×1 cheese slope is the workhorse of microscale roofing. Its angled face creates a visible facet at any distance, and it stacks cleanly in alternating directions to form stepped gables. Cheese slopes come in a wide color range, which makes them useful for both traditional tile roofs and modern flat-edge designs.
Inverted slopes. Flipping a 1×2 or 1×3 slope upside-down creates a smooth upper surface and a stepped lower edge. This is the secret to thatched and shingled roof looks. The Brick Nerd guide to 15 roof techniques shows this in detail, and it works especially well for medieval and fantasy microscale builds.
Cones and round bricks. The 1×1 cone and the 1×1 round brick create focal points at roof peaks, chimney tops, and dormers. A single cone at the apex of a roof signals “this is a peak” from across the room better than any combination of slopes.
Headlight bricks. These slightly domed pieces are perfect for the curved tiles on onion domes, observatory roofs, and Asian-inspired microscale buildings. They also work as chimney caps and finials.
Jumper plates. The 1×2 jumper plate creates an offset step that breaks up flat rooflines. Used sparingly along a parapet, jumpers add just enough variation to keep the silhouette interesting at distance.
Minifig hands and unusual pieces. This is where microscale gets fun. Minifig hands, claws, and small accessory pieces can be repurposed as thatch, gargoyles, weather vanes, or roof decoration. The Brick Blogger community has documented dozens of these alternate uses, and they are a great way to add one-of-a-kind character to a roofline.
Step-by-Step Roofline Construction Techniques
Below is the exact sequence I use when building a microscale roofline that has to read from across the room. Each step builds on the previous one, and skipping ahead usually costs you a re-build.
Step 1: Establish the wall top. Build your walls first and finish them with a clean top course of plates. The roofline will sit on this course, so any unevenness here will show up as wobble in the silhouette.
Step 2: Sketch the roof shape with single pieces. Before committing to a pattern, lay out one or two representative pieces at each corner and at the peak. Stand back and check the silhouette. Adjust the peak height until the shape reads from across the room.
Step 3: Choose your primary roof unit. Pick one piece type to repeat across the entire roof surface. For most microscale builds this is either a 1×1 cheese slope or a 1×2 inverted slope. Mixing too many unit types is the most common cause of busy, unreadable roofs.
Step 4: Lay the first course. Place your chosen unit along the entire eave line. Check the line from a distance. If any section dips or rises, fix it before adding more rows.
Step 5: Stack upward toward the peak. Add rows of your roof unit, working from the eaves up. Use a staggered brick-bond pattern, where each row is offset by half a stud from the row below. This staggered pattern is what gives the roofline its texture at distance.
Step 6: Cap the peak. Finish the roofline with a clearly heavier piece at the ridge. A 1×2 slope, a 1×1 cone, or a headlight brick all work. The peak piece should contrast with the roof color underneath it.
Step 7: Add focal points. Place chimneys, dormers, or finials at the corners or one-third points along the ridge. Limit yourself to three or four focal points total; more than that and the eye stops knowing where to land.
Step 8: Distance check. Walk ten feet away and look at the build for ten seconds. If you can name the building type (house, church, factory, tower) in that time, the roofline is working. If not, return to step two.
Cheese Slope Patterns for Distant Visibility
Cheese slopes are the most common microscale roof unit because they solve three problems at once: they create a visible angled face, they stack cleanly in alternating directions, and they come in dozens of colors. The two patterns I use most are the alternate-direction gable and the brick-bond slope.
The alternate-direction gable places cheese slopes with their angled faces pointing opposite ways on alternating rows. From above, this looks like a fish-scale pattern. From across the room, it reads as a crisp stepped texture. The pattern is forgiving because small gaps between slopes blend into the texture.
The brick-bond slope pattern uses 1×2 slopes in a running bond, with each row offset by one stud. This creates a horizontal striping that catches light differently on each course. It works especially well on long, low microscale buildings like warehouses, train stations, and modern houses.
Tile-Based Roofline Approaches
Tile-based roofs use smooth 1×1 or 1×2 tiles laid flat across the roof plane. They create a clean, modern look and read at distance as a single solid shape rather than a textured one. The trade-off is that any unevenness or gap shows up clearly.
I use tile-based roofs when the building is meant to feel flat-roofed, modern, or industrial. For a stepped silhouette at distance, I rely on slopes. For a smooth silhouette, I rely on tiles. Mixing the two on a single roof almost always weakens the read, so pick one approach per roof.
When you do use tiles, place a contrasting 1×1 round brick or stud at the peak as a finial. Without that single dot of contrast, a tile roof can blend into the wall color and the entire building loses its top edge at distance.
Common Mistakes to Avoid in Microscale Rooflines
Over the years I have made every mistake in the book. Here are the ones that cost me the most re-builds, and the fix for each.
Mistake 1: Too many piece types. A roof with five different piece types looks impressive up close and confusing from across the room. Stick to one or two roof units per roof. Save the variety for chimneys and finials.
Mistake 2: Low contrast colors. Medium gray on dark gray, sand on tan, light blue on white. None of these combinations survive at distance. Always test color choices by taking a phone photo and squinting at it.
Mistake 3: Flat rooflines. A perfectly flat roofline at microscale reads as a single line, which is fine for a modern build but boring for a traditional one. Add at least one peak, gable, or stepped parapet to give the eye a feature to anchor on.
Mistake 4: Skipping the distance check. The most common reason microscale rooflines disappear is that the builder never stood up and looked at the build from across the room. Build a habit of checking every five minutes during the roof phase.
Mistake 5: Forgetting the peak contrast. A roof that fades into the same color at its peak loses the most important visual element. The ridge should always be either a darker tone than the roof slope below it or a clearly heavier piece that catches the silhouette.
Frequently Asked Questions About Microscale Roofline Visibility
What is the 5/2 rule in LEGO microscale architecture?
The 5/2 rule states that one stud on a minifig-scale wall equals roughly half a stud on a microscale wall. This ratio helps builders translate real-world dimensions into microscale features, including rooflines that need to read from a distance. Following this ratio keeps proportions consistent across an entire microscale build.
How do I build a LEGO roof step by step for microscale?
Start with a clean wall top, sketch the roof shape with single pieces, choose one primary roof unit, lay the first course along the eaves, stack rows in a brick-bond pattern toward the peak, cap the ridge with a heavier piece, add three or four focal points, and finish with a distance check from across the room.
Why do my microscale rooflines disappear from across the room?
Rooflines disappear because the individual pieces are too small to resolve at distance, the color contrast against the wall is too low, or the silhouette lacks a strong peak or gable. The fix is to increase pattern repetition, raise color contrast, and add at least one heavy focal piece at the ridge.
What pieces work best for microscale roofline visibility?
Cheese slopes, inverted slopes, cones, headlight bricks, and jumper plates are the most reliable pieces for microscale rooflines that read from a distance. Minifig hands and unusual accessories can also be repurposed as thatch, finials, or weather vanes for added character.
Final Thoughts on Microscale Architecture Rooflines
Rooflines that read from across the room come down to four habits: pick roof pieces for contrast first and color second, repeat the same unit across the whole roof, build a strong peak with a heavier piece, and check the silhouette from ten feet away every few minutes. Apply those habits to your next microscale architecture project and your rooflines will hold up on a shelf, a desk, or a display case across the room.