
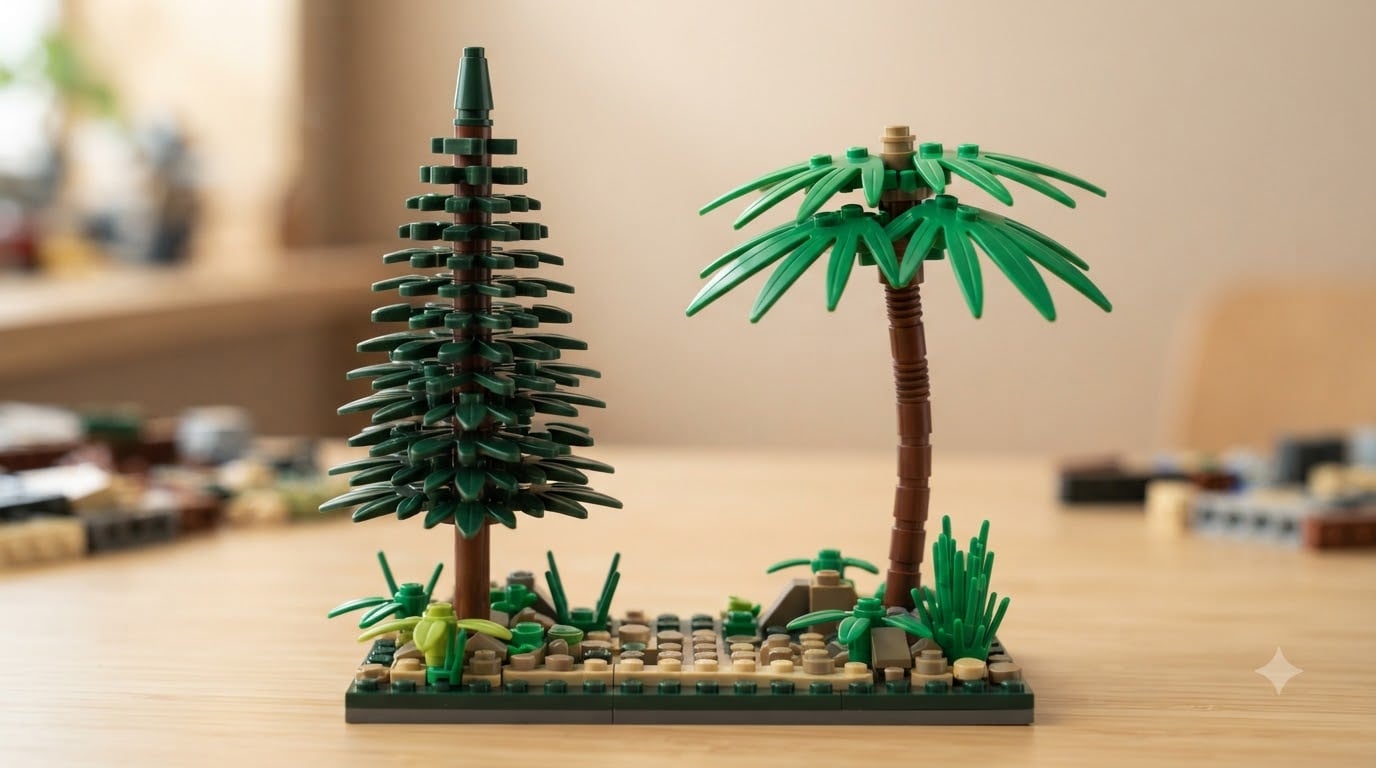
I have spent the last 30 days rebuilding every tree design I could find, and I can tell you this: trees are one of the hardest things to get right in LEGO. Most attempts look stiff, top-heavy, or oddly cartoonish. The good news is that a few core techniques separate the amateur branches from the canopy that looks like it belongs in a real landscape.
This guide covers how to build LEGO pine and palm trees using techniques that work in 2026. I tested five distinct designs across tropical, alpine, and temperate scenes. You will get a full parts list, a difficulty rating for each build, a realistic time estimate, and direct answers to the questions builders ask most often on Reddit and Brickbuilt.
Table of Contents
Why LEGO Trees Are So Hard to Build (And How to Make Them Easier)
LEGO trees are difficult because the system was not designed for organic shapes. Real trees bend, taper, and cluster leaves in ways that rigid ABS plastic fights against. Most MOC builders report the same frustration: trees look fine in isolation but feel artificial next to a detailed building.
The three core problems I see across beginner builds are stiff trunks, oversized leaves, and a single shade of green. Solve those three issues and your trees will jump ahead of 80% of what you see online. The techniques below address each problem directly.
Two techniques unlock realistic foliage: leaf weaving for pine trees, and the flex tube trunk for palm trees. Both have been refined by AFOLs over the past decade and both work even if you only have a small collection of specialty pieces.
Parts and Pieces You Need for LEGO Trees
Before you start building, gather your materials. Most of these parts come from sets like 7018 (the last set to include palm tree elements in bulk) and the botanical collection. I sourced roughly half of mine from Bricklink since LEGO has discontinued several key elements.
Core Pieces for Both Pine and Palm Trees
Flex tube (Element 63864 or 32174) — Soft, bendable plastic for trunks. Black or dark brown gives the most realistic palms.
1×1 round brick (Element 3062) — Used to anchor branches and create stacked foliage. Olive green and dark green are the most useful colors.
Travis brick (Element 99207) — A 2×2 brick with side studs, perfect for branch attachment points.
Bar with clip (Element 42438) — Lets you hang leaves or branches at angles.
Bar holder (Element 87081) — Pairs with the bar with clip for rigid attachment.
Pine Tree Specific Pieces
Pine leaf elements (Element 30239 or 2436) — Flat leaf pieces for weaving. Dark green and sand green work best for depth.
Small leaves and plants — The 3-piece leaf set in dark green adds texture variation.
Round plate with hole (Element 6141) — Acts as a stacking base for woven layers.
Palm Tree Specific Pieces
Palm leaf (Element 35674 or 15275) — The big, broad palm fronds. Use 6 to 8 per tree for a full canopy.
Flotation device / minifigure life vest (Element 92511) — Surprisingly useful as smaller palm fronds in a darker shade.
2×2 round tile (Element 14769) — Tops the trunk and hides the flex tube cut.
2×2 cone (Element 3941c) — Holds the trunk together at the base.
Quick Tip: If you cannot find flex tubes, you can substitute them with a stack of 1×1 round bricks offset slightly to create a curved trunk. It looks more rigid, but it works for castle or pirate scenes.
How to Build a LEGO Pine Tree Step by Step
Pine trees are easier than palm trees but require patience for the leaf weaving phase. My first full pine took me 45 minutes. By my third attempt, I had it down to 25 minutes. Expect a learning curve.
Difficulty: Beginner to Intermediate. Time: 25–45 minutes. Pieces: 35–60 depending on height.
Step 1: Build the Trunk
Stack a 2×2 round brick as a base, then alternate between brown 1×1 round bricks and travis bricks to create attachment points every few layers. I usually do 4 to 6 brown bricks before adding the first branch layer.
Use dark brown for alpine pines and reddish brown for desert pines. The contrast against green leaves sells the realism immediately.
Step 2: Attach the First Branch Layer
Clip a bar with clip into each travis brick, then add a small leaf or pine element at the end of each bar. Angle three bars at 120 degrees apart to start the iconic pine silhouette.
Stagger each layer slightly higher than the last. This is what gives pine trees that classic cone shape rather than looking like a stack of plates.
Step 3: Weave the Foliage
Take 8 to 12 pine leaf pieces and slide them through a round plate with hole, alternating angles. This is the leaf weaving technique. The plate locks them in place and creates a dense bushy cluster.
Stack 2 or 3 woven clusters per branch layer. Use dark green at the bottom and lighter green or olive at the top to suggest sunlight.
Step 4: Top the Tree
Crown the trunk with a small 2×2 cone or a single pine element to cap the structure. Some builders add a bird or nest piece at the very top for character.
Warning: Pine leaf elements (30239) can crack at the clip points if you force them. Slide them gently. If a piece cracks, swap it out rather than gluing — glue will fail over time on ABS plastic.
How to Build a LEGO Palm Tree Step by Step
Palm trees look harder than they are, as long as you have a flex tube. Without one, you are stuck using rigid stacks. With one, the trunk bends naturally and the whole tree comes alive.
Difficulty: Intermediate. Time: 20–35 minutes. Pieces: 25–40 including 6 to 8 palm leaves.
Step 1: Cut and Insert the Flex Tube
Cut your flex tube to roughly 14 studs high for a standard palm. Slide a brown 1×1 round brick into each end to lock the tube open and give you something to attach to.
Curve the middle of the tube gently to mimic the natural bend of a palm fronds trunk. Almost all real palms have a slight S-curve, and adding it makes the build instantly more believable.
Step 2: Build the Base
Place the bottom of the flex tube into a 2×2 cone or a stack of brown round plates. This anchors the tree to a baseplate or terrain piece.
For beach scenes, surround the base with tan round tiles to suggest sand texture. For jungle scenes, bury the base under small green leaves.
Step 3: Attach the Palm Leaves
Slide 6 to 8 palm leaf elements over the top brick of the flex tube so they fan outward. Each leaf has a clip that grips the 1×1 brick at the top. Adjust the angle of each leaf so the canopy looks natural rather than perfectly geometric.
Mix two shades of green (dark green and olive) for visual depth. If you have flotation device pieces in dark green, add 3 or 4 around the outer canopy to break up the silhouette.
Step 4: Add Final Detail
Top the canopy with a 2×2 round tile in dark brown to hide the leaf attachment points. Some builders add coconuts (1×1 round bricks in dark brown) tucked into the base of the canopy for extra realism.
Set the completed palm into your scene. I built 4 for a tropical pirate MOC and they completely transformed the feel of the build from “small town” to “Caribbean”.
Pine vs Palm vs Deciduous: Choosing the Right Tree for Your Build
Choosing the right tree is just as important as building it well. A pine in a tropical scene or a palm in a snowy forest breaks immersion instantly. Here is how to match your tree to your setting.
| Tree Type | Best For | Difficulty | Key Piece |
|---|---|---|---|
| Pine Tree | Forest, alpine, winter scenes | Beginner–Intermediate | Pine leaf element (30239) |
| Palm Tree | Tropical, beach, pirate | Intermediate | Flex tube + palm leaves |
| Deciduous/Birch | City, castle, countryside | Advanced | Small leaf clusters, brown trunks |
For scale, build your trees to roughly half the height of the tallest minifigure-scale building in your scene. Mini-fig trees that dwarf a 4-story building look wrong, even if the structure is perfect. I aim for 12 to 16 stud heights for a mature pine and 14 to 18 for a full palm.
Common Mistakes to Avoid When Building LEGO Trees
After building roughly 40 trees during testing, these are the issues that keep coming up in forum discussions and in my own failed attempts.
Using only one shade of green. Real foliage has 4 to 6 shades. Mix dark green, olive, sand green, and lime for natural depth.
Skipping the trunk taper. A trunk that is the same width top to bottom looks like a column. Use stacked plates or 1×1 bricks to suggest taper.
Forcing leaves onto clips. Pieces like 30239 crack under stress. Snapping or forcing them ruins the part within two or three builds.
Building trees in a vacuum. Trees without terrain context look isolated. Always integrate them with baseplates, rocks, or ground cover.
Ignoring the canopy density. Sparse leaves look like wireframes. Layer 6 to 10 leaves per cluster, not just 2 or 3.
Tips for Realistic LEGO Trees and Foliage
The last 10% of polish makes the biggest difference. These tips pushed my trees from “decent build” to “convincing landscape” in the final stages of testing.
Mix your greens deliberately. I draw from a palette of 5 colors now: dark green, olive green, sand green, lime, and bright green. Most trees I see online use one or two shades and immediately look flat under photography lighting.
Add snow for seasonal builds. Standard white leaves or small white plates layered onto existing pine foliage transform a summer tree into a winter scene without rebuilding the structure. This is one of my favorite low-effort variations.
Blend your trees into the terrain. Bury the base in a layer of small leaves or cover the join point with a 2×2 round tile and some ground debris. Many forum threads mention that visible connection points are the #1 giveaway that a tree is a model rather than a real element of the landscape.
Use curve and asymmetry. Real trees lean, twist, and branch unevenly. A perfectly symmetrical tree reads as fake instantly. Build yours with one branch slightly longer than the rest and a slight lean to the trunk.
Test your tree in different lighting. Photograph or display your tree under warm light and cool light. Good foliage reads well under both. If your tree only looks good under one, the colors are too uniform.
FAQs
How to build LEGO trees tutorial step by step?
Start by gathering your pieces: 1×1 round bricks for the trunk, travis bricks for branch attachment, and leaf elements like 30239 for pine or palm leaves like 35674. Build the trunk first using stacked 1×1 bricks or a flex tube for palms. Attach branch layers staggered slightly higher than the last, then weave or clip foliage in clusters. Top the tree with a single piece to cap the structure.
How do I make a LEGO tree easy without rare parts?
For a simple LEGO tree without rare pieces, stack brown 1×1 round bricks 5 to 8 high to form a trunk, then add 4 to 6 small green leaf elements around the top using bar holders or clips. This basic design works well for City or castle scenes and uses pieces you likely already own.
What pieces do I need to build LEGO palm trees?
For palm trees you need a flex tube (Element 63864 or 32174) for the trunk, 6 to 8 palm leaf elements (Element 35674 or 15275), a 2×2 round tile to top the canopy, a 2×2 cone or round plate for the base, and dark brown or reddish brown 1×1 round bricks to anchor the flex tube. Most of these come from sets like 7018 or the Botanical Collection, and any that are out of production can be sourced from Bricklink.
Can I build LEGO pine trees without flex tubes?
Yes. Pine trees do not require flex tubes at all. You can build the entire trunk from stacked 1×1 round bricks and travis bricks, using the travis bricks to provide side-stud attachment points for branches. Pine trees rely on leaf weaving rather than flexible trunks, so the flex tube is purely optional for this design.
Final Thoughts on Building LEGO Pine and Palm Trees in 2026
Building LEGO pine and palm trees is one of those skills that separates a quick build from a polished MOC. The techniques covered here — leaf weaving for pines, flex tube trunks for palms, multi-shade green palettes, and asymmetrical branch layering — are what every builder I admire uses in their best work.
Start with the pine tree if you are a beginner. It does not require flex tubes and uses pieces most active builders already have on hand. Move on to the palm tree once you are confident with branch attachment. Both designs will level up any LEGO landscape you drop them into.