
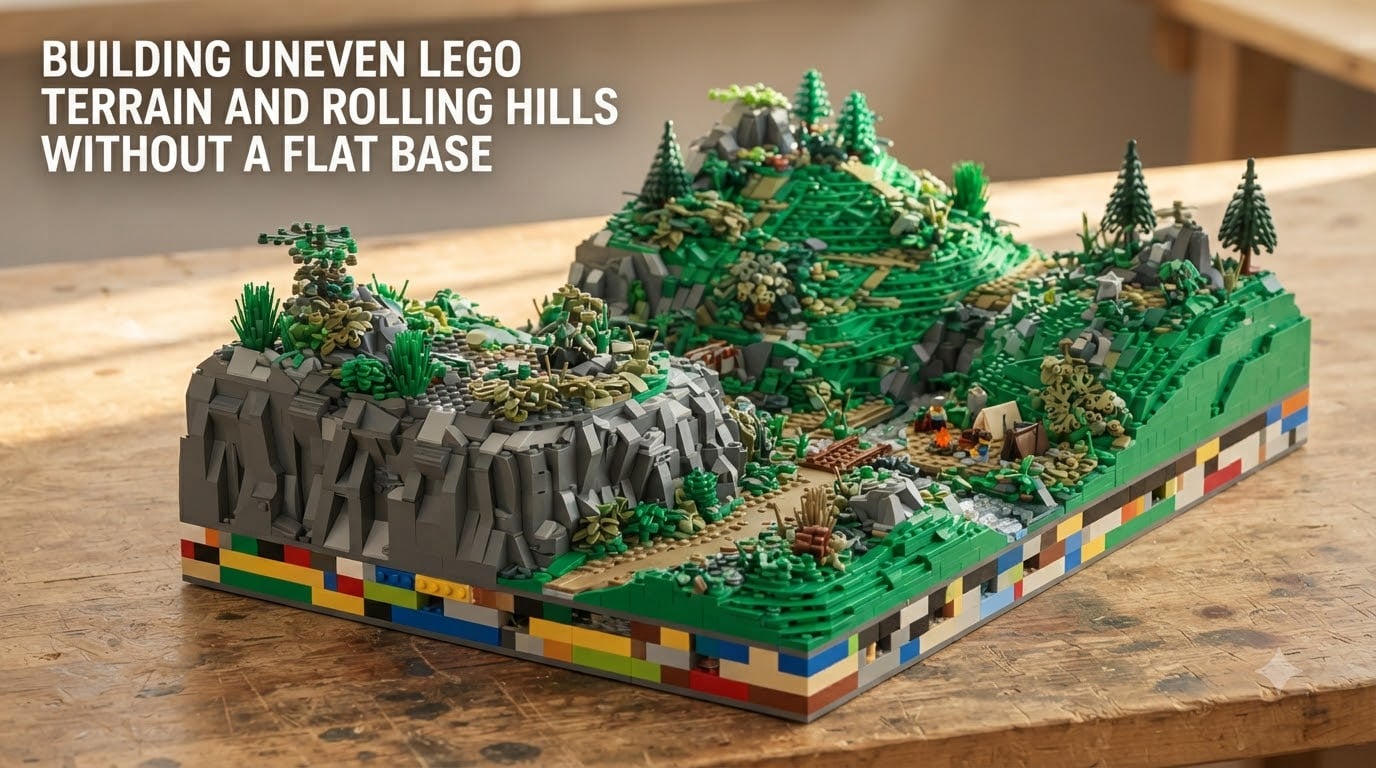
Flat baseplates are where most LEGO builds start, but they are also where most builds get boring. The moment you want a castle on a craggy cliff, a farmhouse on a rolling hill, or a mountain road that switchbacks through elevation changes, that flat green rectangle becomes a prison. Building uneven LEGO terrain and rolling hills without a flat base is one of the most rewarding skills you can develop as a builder, and it is easier than most people think.
I have spent years building LEGO landscapes for photography, and almost every technique I rely on today was learned through trial and error. The good news is that the core methods are surprisingly simple. A handful of principles, a few specific piece types, and some patience are all you need to transform a flat table into a dynamic, naturalistic landscape.
This guide covers everything from the foundational 5/2 rule (which no competitor in this space explains for terrain) to the Duplo foundation method, rockwork techniques, and how to create smooth rolling hills without ever touching a baseplate. Whether you are building a castle MOC, expanding a city layout, or creating a winter village diorama, these techniques will change how you think about LEGO ground.
Table of Contents
Why Build Terrain Without a Flat Base?
Most LEGO sets assume you are building on a flat surface. Official baseplates come in green, gray, blue, and white, and they are designed to sit perfectly level on a table. The problem is that real landscapes are not flat. Hills rise and fall. Cliffs drop sharply. Valleys dip between ridges. When you constrain your build to a baseplate, you lose the dimensional storytelling that makes a diorama feel alive.
Building without a flat baseplate gives you three major advantages. First, you can create real elevation changes that look correct from every camera angle, which matters enormously for LEGO photography. Second, modular terrain sections built without baseplates can be rearranged, stacked, and combined in ways that fixed plates do not allow. Third, free-form terrain uses fewer pieces for the same visual impact because you are building volume efficiently instead of filling a flat grid.
The community on Eurobricks and Reddit has been moving toward modular terrain for years. Builders share techniques for creating standalone hills, cliff sections, and rock formations that connect to each other without needing a giant plate underneath. This approach makes storage easier, transport simpler, and creativity more flexible since you can reconfigure your landscape for different scenes.
If you have ever tried to make a building sit on a slope and felt frustrated that it looked wrong, the problem was probably the baseplate. Once you free yourself from the flat foundation, buildings can sit naturally on hillsides, roads can climb at realistic grades, and your layouts gain a sense of place that flat builds simply cannot match.
The 5/2 Rule: LEGO’s Hidden Mathematical Foundation
The 5/2 rule is one of the most important concepts in LEGO building, and almost no terrain guide explains it. The rule states that five plates stacked vertically equal the height of two standard bricks. This means five plates (1.6 cm) and two bricks (1.6 cm) are exactly the same height. This ratio is the mathematical backbone of the entire LEGO system, and it governs every technique in this guide.
Why does this matter for terrain? Because terrain is all about elevation changes, and elevation changes are all about managing vertical height in small increments. A single plate adds 3.2 mm of height. A single brick adds 9.6 mm. When you understand that five plates equal two bricks, you can mix and match these elements to create smooth, precise transitions between different elevations.
For rolling hills, the 5/2 rule lets you step up or down in plate-height increments without creating jarring jumps. If you need to raise a section of terrain by exactly one brick height, you can use three plates (since three plates do not equal one brick, but combined with other offsets you can fine-tune). For more precise work, SNOT (Studs Not On Top) techniques rely on the 5/2 ratio to position elements sideways at correct heights.
The 5/2 rule also explains why Duplo bricks integrate so well with standard LEGO. A Duplo brick is exactly twice the dimensions of a standard LEGO brick in length, width, and height. This means one Duplo brick equals the height of two standard bricks, or five plates. When you build a Duplo foundation and transition to standard bricks on top, the math works out perfectly without any height mismatches.
Keep this ratio in mind throughout every technique in this guide. Every time you need to adjust elevation, think in terms of plates and bricks and how their ratios interact. Once internalized, the 5/2 rule becomes second nature and your terrain will fit together with precision.
The Duplo Foundation Technique (Step by Step)
The Duplo foundation technique is the single most efficient way to build large terrain forms without a flat base. Duplo bricks are twice the size of standard LEGO bricks, which means they provide four times the volume per piece. This lets you build up the bulk of a hill, mountain, or raised platform in a fraction of the time and with far fewer pieces than using standard bricks alone.
The connection between Duplo and standard LEGO is built into the system. Every Duplo stud has a hollow center that fits a standard LEGO stud perfectly. This means you can place regular bricks directly on top of Duplo and they will clutch securely. The transition is seamless and structurally sound.
Here is the step-by-step process:
Step 1: Plan your terrain shape. Before placing a single brick, sketch out the footprint of your terrain on paper or visualize it. Decide where the highest points will be, where slopes will descend, and where flat areas are needed. This prevents wasted Duplo and ensures your foundation matches your vision.
Step 2: Lay the Duplo foundation. Start by placing Duplo bricks in the rough shape of your terrain’s base. Stack them higher where you need peaks and keep them low or absent where you want valleys. Use 2×2 and 2×4 Duplo bricks for flexibility. At this stage, the build will look blocky and abstract, and that is completely fine. You are creating volume, not detail.
Step 3: Add a transition layer. Place a layer of standard bricks or plates on top of the Duplo studs. This layer serves two purposes: it covers the Duplo so it is no longer visible, and it provides a smooth surface of standard studs for your detailed terrain work. Use 2×4 and 2×6 bricks for fast coverage, filling gaps with smaller pieces as needed.
Step 4: Shape the silhouette. Now that your foundation has the right height and a standard stud surface, start refining the shape. Add and remove bricks to create the contours you want. This is where the terrain transitions from a blocky mass to a recognizable landform. Step back frequently and check the profile from multiple angles.
Step 5: Apply the surface technique. Once the silhouette is right, cover the surface with either rockwork (for steep terrain) or wedge plate layering (for rolling hills). The next two sections cover each technique in detail.
A note on stability: Duplo foundations are sturdy, but tall narrow peaks may wobble. If your terrain will be transported or photographed at angles, reinforce the interior of the Duplo stack with overlapping brick patterns rather than stacking identical pieces directly on top of each other. Interlocking layers distribute stress and prevent collapses.
Building Rockwork for Steep Terrain
Rockwork is the technique for creating steep, rocky terrain like cliffs, mountain faces, and canyon walls. The defining characteristic of rockwork is visible slope pieces arranged to mimic natural stone. When done well, rockwork adds drama and verticality that flat or rolling terrain cannot achieve.
The core piece types for rockwork are slopes (33-degree and 65-degree), curved slopes, inverted slopes, and rock brick elements. Each creates a different texture and angle. The key to natural-looking rockwork is variation: mixing slope angles, alternating directions, and breaking up repetitive patterns.
Here is the process for building rockwork on your Duplo foundation:
Step 1: Work from bottom to top. Always place your lowest slope pieces first and build upward. Each layer of slopes should overlap the one below it, just like real rock strata. This creates the visual impression of geological layers and ensures structural stability since each piece rests on the one beneath it.
Step 2: Mix slope angles. Use 65-degree slopes for near-vertical cliffs, 33-degree slopes for moderate inclines, and curved slopes for smoother transitions between angles. A cliff face that uses only one angle looks artificial. Real rock varies, and your build should too.
Step 3: Alternate slope directions. This is the single most important tip for avoiding the repetitive pattern problem. If every slope points the same way, the rock face looks like a staircase rather than a natural formation. Mix left-facing and right-facing slopes. Use 1×2 and 1×4 slopes alongside 2×2 and 2×4 sizes. Random placement (within a plan) produces organic results.
Step 4: Use inverted slopes for overhangs. Inverted slope pieces, mounted under a ledge, create the appearance of rock overhangs and undercut formations. These are what separate amateur rockwork from convincing terrain. Place them sparingly for maximum impact, perhaps at a cliff midpoint where a rock layer has eroded beneath a harder stone cap.
Step 5: Add striations and texture. For advanced rockwork, use plate layering between slope rows to create thin horizontal lines that mimic sedimentary rock. Alternate colors slightly between layers (dark gray below, light gray above) to suggest different rock types. Curved wedge pieces can be used to create rounded boulder formations that break up angular slope patterns.
Step 6: Soften with vegetation. Even the best rockwork benefits from foliage. Place small plant pieces, leaf elements, and flower studs in cracks and on ledges. This sells the natural look and conveniently hides any gaps or imperfect connections in your rockwork. One or two well-placed vines dangling from an overhang can transform a static cliff into a living landscape.
Community builders on Eurobricks consistently recommend stepping back every few minutes to evaluate rockwork from a distance. What looks good up close may reveal repetitive patterns when viewed from across the room. Distance evaluation catches the staircase effect before it becomes embedded in your build.
Creating Rolling Hills with Wedge Plates
Rolling hills are the gentle counterpart to rockwork. Where rockwork is steep and dramatic, rolling hills are smooth and subtle. The goal is to create gradual elevation changes that look like countryside, meadows, or the kind of soft terrain you might find around a farmhouse or village.
The primary tools for rolling hills are wedge plates and tiles. Wedge plates are plate elements with one angled edge that, when arranged in patterns, create the impression of a slope curving across a surface. Unlike slope bricks (which are vertical pieces that create faces), wedge plates lie relatively flat and create the impression of terrain tilting at a gentle angle.
Here is how to build rolling hills on your Duplo foundation:
Step 1: Establish plate-height steps. Before placing any wedge plates, create the elevation change in your transition layer using plate stacking. Remember the 5/2 rule: five plates equal two bricks in height. By adding or removing plates from your transition layer, you create small height differences that the wedge plates will smooth over. The goal is a stepped pyramid shape where each step is only one or two plates high.
Step 2: Lay wedge plates over the steps. Place wedge plates so that the angled edge spans the height difference between two steps. The wedge plate creates a visual ramp that transitions smoothly from one elevation to the next. Use multiple wedge plates side by side to cover the width of the slope, arranging them so the angles flow in the same direction.
Step 3: Curve the hill shape. Real hills are not straight ramps. To create curves, vary the direction of your wedge plate rows. On one section of the hill, have the plates angle left. On another, have them angle right or curve around. This creates the three-dimensional dome shape that distinguishes a rolling hill from a ramp.
Step 4: Fill gaps with tiles and plates. Wedge plates leave small triangular gaps where angled edges meet. Fill these with tiles and small plates in matching colors. The surface should be completely covered with no visible gaps. Once tiled over, the wedge plate layer reads as a single smooth surface rather than individual pieces.
Step 5: Add surface texture. Smooth hills can look flat and lifeless without texture. Add round 1×1 plates, flower studs, plant pieces, and small tile details to suggest grass, rocks, and ground cover. The texture breaks up the smooth surface and makes the hill read as living terrain rather than a plastic dome.
Step 6: Test with structures. Place a building or minifigure on your rolling hill to check that it sits naturally. If the structure looks like it is floating or tilting unnaturally, adjust the wedge plate angles or add plate shims under the building’s base. The 5/2 rule is your friend here for fine-tuning the exact height needed for a level structure on a slope.
One common question from the LEGO community is how to make rolling hills look different from each other. The answer is variation in scale and direction. A small hill with tight wedge plate curves looks nothing like a broad, sweeping rise with gentle angles. Experiment with different wedge plate sizes (3×6, 4×6, 6×12) to create different hill personalities.
Transitioning Between Rockwork and Rolling Hills
Most real landscapes are not entirely rocky or entirely smooth. A mountainside might be sheer rock at the bottom, transitioning to scrubby slopes in the middle, and rolling meadows at the top. Creating these transitions in LEGO is what separates a good terrain build from a great one.
The key to transitions is the concept of topographic layers. Think of your terrain as having horizontal bands at different elevations. The lowest band might be vertical rockwork. The middle band is moderate slopes. The top band is rolling wedge plate terrain. Each band overlaps the one below it, creating a natural progression from steep to gentle.
Start at the bottom with your rockwork, building up to the elevation where the terrain begins to moderate. At that transition point, switch from slope bricks to a combination of 33-degree slopes and curved slopes that bridge the gap between vertical rock and horizontal ground. Above that, begin your wedge plate rolling hill technique.
The overlap zone is where the magic happens. Do not create a hard line where rockwork ends and hills begin. Instead, interleave the two techniques. A curved slope here, a wedge plate there, a rocky outcrop poking through the grass. This interleaving creates the organic randomness that makes terrain look natural rather than designed.
Foliage is your best friend in transition zones. Dense vegetation naturally occurs where rocky terrain meets soil, as plants take root in the cracks and crevices between rock and earth. Cluster leaf pieces, vines, and small plants along the transition line. They hide the structural joints between techniques and sell the idea that this is a living landscape where rock gradually gives way to soil and grass.
Color Matching and Camouflage Techniques
Color is one of the most underrated aspects of LEGO terrain building. The right color choices can make a simple technique look stunning, while poor color matching can make expensive techniques look cheap. For naturalistic terrain, color serves two purposes: realism and camouflage.
For realism, match your colors to the type of landscape you are building. Rocky cliffs look best in grays, with darker grays at the base (suggesting shade and moisture) and lighter grays above. Rolling hills want earth tones underneath (reddish brown, dark brown, tan) with green on top. Mixing two or three shades within the same color family creates depth and texture that a single flat color cannot match.
For camouflage, use color to hide structural elements. The transition layer between your Duplo foundation and surface technique does not need to match the surface color. It needs to be completely covered. Use whatever colors you have in abundance for the hidden structural layers. Save your matching colors for the visible exterior where they will be seen.
Dark colors recede and light colors advance. Use this to your advantage when photographing terrain. Dark gray rockwork at the base of a formation creates shadow depth. Light tan or light gray at the top catches light and draws the eye upward. This simple contrast makes terrain look more three-dimensional in photos than it actually is.
Foliage color should complement the terrain, not match it. Bright green plants on a gray cliff create contrast that draws attention to both elements. Dark green plants on a rolling hill blend into the surface and add subtle texture. Choose your plant colors based on the mood you want: vibrant greens for lush landscapes, olive and dark greens for moody scenes.
Common Terrain Building Mistakes to Avoid
After building terrain for years, I have made every mistake in the book. Here are the most common ones and how to avoid them.
The staircase effect. Placing all slopes in the same direction and at the same angle creates a look that resembles a staircase rather than natural rock. The fix is simple: vary slope directions, mix angles, and break up patterns with occasional pieces that point differently from their neighbors.
Insufficient internal structure. Terrain that looks great on the table can collapse the moment you move it. Always interlock your Duplo and brick layers. Never stack identical pieces directly on top of each other for more than two layers. Offset each layer by at least one stud to distribute weight and stress.
Ignoring the 5/2 rule. If your wedge plates do not line up or your slopes have unexpected height gaps, you have probably mixed plates and bricks without accounting for the 5/2 ratio. Always calculate height in terms of the ratio. Five plates equal two bricks. Plan your layers accordingly.
Using illegal building techniques. An illegal building technique in LEGO is any connection that stresses or damages the pieces. This includes bending flexible pieces beyond their tolerance, wedging elements together that were not designed to connect, or putting weight on connections that cannot support it. In terrain building, the most common illegal technique is forcing slope pieces into positions that stress the stud connections, causing micro-fractures over time. If a piece requires significant force to place, reconsider your approach. The clutch power should hold pieces together without strain.
Flat lighting on terrain. This is a photography mistake rather than a building mistake, but it matters. Flat front lighting erases all the texture and depth you built into your terrain. For LEGO photography of terrain, use side lighting or low-angle lighting that creates shadows in the slopes and rockwork. The shadows are what make the elevation changes visible on camera.
FAQs
What is the 5/2 rule in LEGO?
The 5/2 rule states that five LEGO plates stacked vertically equal the height of two standard LEGO bricks. Both measure exactly 1.6 cm tall. This ratio is the mathematical foundation of the LEGO system and allows builders to combine plates and bricks with precise height control, which is essential for creating smooth terrain elevation changes.
What is an illegal building technique in LEGO?
An illegal building technique is any connection that stresses, warps, or damages LEGO pieces. Common examples include forcing elements together that were not designed to connect, bending pieces beyond their tolerance, or loading weight on unsupported connections. In terrain building, avoid forcing slope pieces into strained positions that cause micro-fractures over time.
How do you make slopes in LEGO?
To make slopes in LEGO, use slope bricks (available in 33-degree and 65-degree angles) placed from bottom to top with each layer overlapping the one below. For rockwork, mix different slope angles and alternate directions to avoid repetitive patterns. For gentle rolling hills, use wedge plates layered over plate-height steps to create smooth, gradual inclines.
Can you build LEGO terrain without a baseplate?
Yes. You can build LEGO terrain without a baseplate by using Duplo bricks as a foundation for bulk volume, covering them with a transition layer of standard bricks, and then applying surface techniques like rockwork or wedge plate rolling hills. This modular approach allows for real elevation changes, easier transport, and flexible rearrangement of terrain sections.
Conclusion
Building uneven LEGO terrain and rolling hills without a flat base opens up creative possibilities that baseplate-bound builds simply cannot reach. Start with the 5/2 rule as your mathematical foundation, use Duplo bricks for efficient volume, then choose rockwork for steep drama or wedge plates for gentle hills. Mix the two at transition zones, camouflage with color and foliage, and your landscapes will come alive.
Grab your slopes and wedge plates, and start building upward. Your next MOC does not need to start flat.