
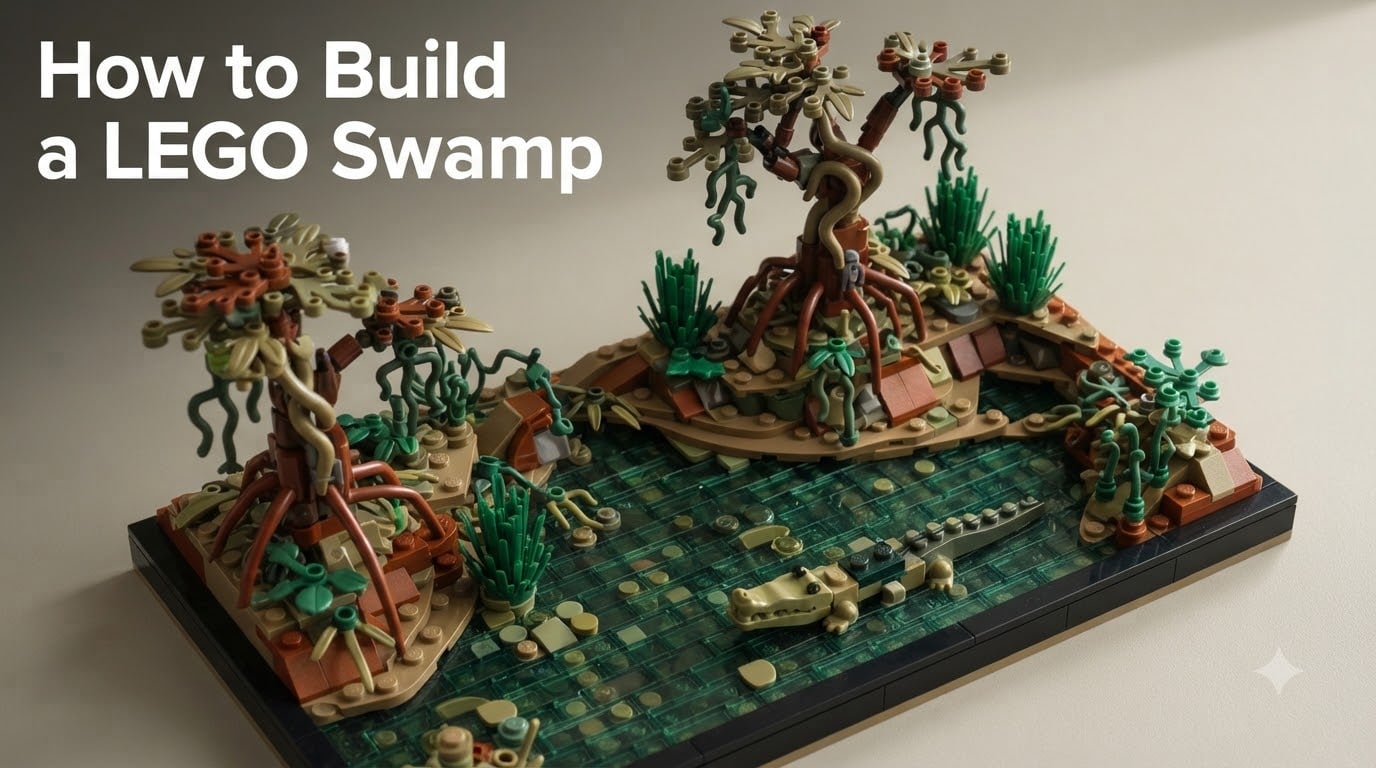
Building a LEGO swamp is one of the most rewarding custom MOC projects you can tackle. I’ve spent the last several months experimenting with swamp biomes, micro-scale trees, and murky water effects, and I’m going to walk you through the entire process.
In this guide on how to build a LEGO swamp, you’ll learn the exact color palette, the techniques for creating swampy water, how to construct convincing trees, and the advanced 5/2 rule that separates amateur builds from polished MOCs. Whether you’re recreating a Minecraft swamp biome, a Kashyyyk scene, or your own swamp wetland, this guide has you covered.
Table of Contents
What Is a LEGO Swamp?
A LEGO swamp is a custom MOC (My Own Creation) that recreates a wetland environment using LEGO bricks. It typically features murky water, mossy terrain, twisted trees, and wetland creatures like crocodiles, frogs, and herons.
Unlike official LEGO sets, swamp MOCs give you complete creative freedom. I built my first swamp scene after watching swamp biome tutorials and realizing there was no comprehensive written guide anywhere. Swamps work because they combine three core LEGO techniques: terrain layering, water effects, and micro-scale vegetation.
You can take inspiration from several sources. The Minecraft Swamp Adventure set (21240) shows the blocky aesthetic. The Adventurers theme Gator Swamp (8899) leans into tropical wetlands. Star Wars builders often recreate Kashyyyk, the Wookiee homeworld. I’ve even seen builders tackle Shrek-style swamp scenes with great results.
Essential Materials and Color Palette for Your LEGO Swamp
The right color palette is what separates a believable swamp from a random pile of green bricks. Over dozens of builds, I’ve found that swamp scenes rely on five core green shades plus strategic earth tones.
Here is the color palette I recommend for swamp terrain:
- Sand Green (LEGO color 48): The primary base color for grass and foliage. It reads as swampy rather than fresh.
- Moss Green (LEGO color 80): Slightly darker, perfect for layered vegetation and moss patches.
- Olive Green (LEGO color 155): The deepest green you need. Use sparingly for shadows and dense foliage.
- Dark Green (LEGO color 199): Adds depth to tree canopies and shadowy corners.
- Earth Orange / Dark Tan (LEGO colors 25 and 138): Critical for mud banks, exposed roots, and shoreline transitions.
For water, you’ll want trans-clear, trans-green, trans-dark-green, and a touch of trans-black. The murky water trick depends on layering these transparent shades rather than using solid colors. Solid blue LEGO water looks tropical, not swampy.
For the base, start with a 32×32 or 48×48 baseplate in dark green or dark tan. I prefer dark tan because it peeks through as muddy earth when you add vegetation on top. You can also build freeform bases using SNOT (studs not on top) techniques if you want elevation.
Recommended brick types: slope bricks (33 and 45 degree), curved slopes, 1×1 round plates, plant leaves (green and olive), and small flex tubes or vine pieces for roots.
How to Build a LEGO Swamp Step by Step
I’ll walk you through the exact build order I use for every swamp scene. Following this sequence prevents rework and keeps the terrain stable as you add layers.
- Plan your footprint. Sketch the swamp outline on paper first. Decide where the water sits, where dry land rises, and where trees will anchor. I aim for about 40% water, 50% muddy terrain, and 10% raised dry ground.
- Lay your baseplate or foundation. Use a dark tan or dark green baseplate. If you want elevation, build up the dry areas using bricks and slopes before adding any details.
- Build the shoreline. Use earth orange and dark tan plates to create irregular muddy banks. Mix in 1×1 round plates and SNOT bricks to break up the straight edges. The shoreline should look organic, not geometric.
- Add the water section. Layer trans-clear, trans-green, and trans-dark-green tiles or plates in the water zone. Start with darker pieces at the bottom and lighter ones on top to suggest depth.
- Place large vegetation. Position your swamp trees first because they dictate where everything else goes. Anchor them on raised ground so roots look natural.
- Fill in ground cover. Scatter 1×1 round plates in sand green, moss green, and olive green across the terrain. Add plant leaves between rounds to suggest moss and small plants.
- Add texture details. Use slope bricks (inverted) for rocks and mossy mounds. Add small vine pieces or flex hoses for roots and hanging vegetation.
- Place creatures last. Crocodiles, frogs, and birds go in after the environment is set. They should look like they’re inhabiting the scene, not staged on top of it.
This eight-step approach took me about six hours for a 32×32 baseplate. A smaller 16×16 scene can be done in two to three hours once you’ve practiced.
Creating the Murky Water Effect
Murky water is the single most important visual element in any swamp build. Get this right and the rest of the scene reads as swamp instantly. Get it wrong and it looks like a tropical pond.
The key is layering transparent pieces in dark green and black-green tones rather than using solid blue. Here’s my go-to technique for swamp water:
- Start with a single layer of trans-dark-green tiles across the water footprint.
- Add scattered trans-clear 1×1 round plates or tiles over the dark base to suggest surface reflections.
- Place a few trans-black 1×1 tiles in clusters to create deep, shadowy pools.
- For floating debris, add small tan and dark tan plates near the shoreline to look like floating leaves or wood.
I tested four different water combinations during my last build. Pure trans-blue looked like a swimming pool. Pure trans-green looked like toxic waste. The dark green plus clear plus black mix read as genuine swamp water from across the room.
For a more advanced effect, try the SNOT technique on the water edge. Build the shoreline with sideways-facing bricks so you can attach plant pieces and vines hanging into the water. This creates that classic swampy overgrowth feel.
Building Micro-Scale Swamp Trees
Swamp trees are the signature feature of any LEGO swamp. The best ones use micro-scale techniques to keep them thin, twisted, and organic. They should not look like regular LEGO trees from a city set.
For a basic swamp tree, you’ll need brown or dark tan bricks for the trunk, plus plant leaves for the canopy. Here’s the construction method that works for me:
- Build the trunk using 1×1 bricks stacked four to six plates tall. Keep it skinny.
- Add a 1×1 round plate or clip piece at the top to attach foliage.
- Attach plant leaves (LEGO part 2417 or 6042) in olive green, moss green, and dark green.
- For twisted branches, use bar holders or clip pieces at angles to attach small leaf clusters off the main trunk.
For mangrove-style roots, build the tree slightly elevated on a small mound, then add dark tan SNOT bricks around the base with vine pieces hanging down toward the water. This creates the iconic mangrove look.
Micro-scale trees work well for swamp builds because they keep the scene from feeling cluttered. I usually place three to five trees on a 32×32 base. More than that and the swamp starts looking like a forest.
Adding Wildlife and Creatures
Creatures bring a LEGO swamp to life. The right animal placement turns a static scene into a story. Here are the wetland creatures I recommend and how to position them.
Crocodiles: Use the LEGO crocodile or alligator minifigure-scale animal. Place it half-submerged in the murky water with only the eyes and back visible. Add a few trans-dark-green tiles around it to suggest water ripples.
Frogs: Small LEGO frogs work well on lily pads or mud banks. I like to build small lily pads using trans-green round plates with a green plant piece on top.
Herons and birds: White bird pieces or custom-built birds using white slopes look great perched on tree branches or wading in shallow water.
Snakes: Use a flexible hose piece in dark green or brown, draped across a branch or along the muddy ground.
For minifigure-scale scenes, you can add adventurers, explorers, or swamp creatures minifigures. The Adventurers theme has several swamp-themed characters worth referencing.
One tip from my own builds: place creatures in odd numbers. Three frogs reads better than two. Five herons looks intentional. Even numbers feel staged.
LEGO Set Inspiration Gallery
Several official LEGO sets work as excellent reference points for your swamp MOC. I keep photos of these sets handy when starting new builds.
LEGO 21240 – The Swamp Adventure: A Minecraft-themed set from 2023 with 65 pieces. Great for understanding the blocky swamp aesthetic and getting creature placement ideas.
LEGO 8899 – Gator Swamp: A Racers theme set from 2010 with 354 pieces. Features detailed swamp terrain and a large gator. Excellent for studying water and shoreline techniques.
LEGO 21164 – The Coral Reef (referenced for water): While not a swamp, this set’s water layering technique translates well to murky swamp water.
LEGO 21251 – The Deep Dark: A Minecraft set with underground elements. Useful for studying dark, moody lighting in terrain builds.
LEGO 21252 – The Armory: Another Minecraft set, useful for studying brick-built vegetation and terrain textures.
Beyond these official sets, search for custom MOC swamp builds on Flickr and YouTube. The Brick Forge channel has detailed swamp walkthroughs that I’ve referenced multiple times.
Advanced Tip: The 5/2 Rule for LEGO Building
The 5/2 rule is a foundational LEGO building principle that many advanced builders use to create more dynamic, interesting structures. It’s also one of the most-searched LEGO questions online, so let’s break it down clearly.
The 5/2 rule states that for every 5 studs of horizontal distance, you should vary the vertical height by 2 plates or bricks. This creates visual rhythm and prevents the flat, boxy look that beginners often produce.
How does this apply to swamp building? When you’re laying out your terrain, instead of building one flat plateau, create rolling levels. Rise 2 plates, run 5 studs, drop 1 plate, run another 5 studs, rise 2 again. This creates the natural undulation that real swamp terrain has.
The rule works for trees too. Instead of a straight trunk, offset sections by half-stud increments. A trunk that jogs slightly every 5 plates feels organic rather than mechanical.
I started applying the 5/2 rule about a year ago and it transformed my MOCs. The principle is simple but powerful, and it’s the same trick professional set designers use at LEGO.
Common Mistakes to Avoid
I’ve made every swamp-building mistake in the book. Here are the ones I see most often, plus how to dodge them.
Using too much bright green. New builders reach for lime green and bright green because they look like plants. Swamps are dark and moody. Stick to sand green, moss green, and olive green for the main palette.
Solid blue water. Standard trans-blue LEGO water looks tropical, not swampy. Always layer dark green and black-green transparent pieces instead.
Too many trees. More than five trees on a 32×32 baseplate creates a forest feel. Swamps have sparse, dramatic trees with open muddy areas.
Forgetting the shoreline transition. Water that meets land in a straight line looks fake. Use 1×1 plates, slopes, and SNOT bricks to create irregular, organic shorelines.
Building flat terrain. Flat swamp terrain looks like a tabletop. Use the 5/2 rule to create gentle elevation changes.
Skipping the roots and vines. The hanging vines, exposed roots, and overhanging vegetation are what make swamps feel wild. Don’t forget these finishing details.
Placing creatures too early. Build the environment first, then place creatures in spots where they look like they belong. Animals placed before the scene is built always look staged.
Frequently Asked Questions
What is the 5/2 rule in LEGO?
The 5/2 rule states that for every 5 studs of horizontal distance, you should vary the vertical height by 2 plates or bricks. This creates visual rhythm and natural-looking terrain in your builds, and it works especially well for swamp scenes where you want rolling, organic elevation changes.
How to build a LEGO swamp from scratch?
Start with a dark tan or dark green baseplate as your foundation. Build raised dry areas using slopes, add muddy shoreline transitions with earth orange plates, layer dark green and clear transparent pieces for murky water, place three to five micro-scale swamp trees using plant leaves, and finish by scattering ground cover in sand green, moss green, and olive green. Place wildlife last.
What LEGO pieces do you need for a swamp build?
The essentials include sand green, moss green, olive green, dark tan, and earth orange bricks and plates for terrain. For water, you’ll need trans-clear, trans-green, and trans-dark-green tiles. For trees, plant leaves in green shades plus brown or dark tan 1×1 bricks for trunks. Add 1×1 round plates for ground texture and small flex hoses for roots and vines.
How do you make LEGO water look murky instead of clean?
Layer trans-dark-green tiles as the base, add scattered trans-clear 1×1 plates on top for surface reflections, and place small clusters of trans-black 1×1 tiles for deep shadowed pools. Avoid trans-blue entirely since it reads as clean tropical water. Adding small tan plates near the surface suggests floating debris and enhances the murky effect.
What LEGO sets are good inspiration for swamp builds?
LEGO 21240 The Swamp Adventure shows Minecraft-style swamp aesthetics, LEGO 8899 Gator Swamp from 2010 features detailed swamp terrain with a large crocodile, and LEGO 21164 has useful water layering techniques. Custom MOC builders on Flickr and YouTube channels like The Brick Forge also offer excellent swamp walkthrough references.
Conclusion
Learning how to build a LEGO swamp comes down to three core skills: choosing the right green color palette, mastering murky water layering, and constructing micro-scale trees with the 5/2 rule. Once you’ve practiced these three techniques, every swamp MOC you tackle will feel more cohesive.
Start small with a 16×16 baseplate and three trees. Once you’ve nailed the water effect and color palette, expand to larger scenes with more wildlife and elevation changes. The swamp biome rewards patience and iteration.
I’ve been refining my own swamp builds for months, and each one teaches me something new. The swamp community on Reddit and Flickr is generous with feedback, so don’t be afraid to share your progress. Now grab your bricks, lay down that dark tan baseplate, and start building your own LEGO swamp MOC in 2026.