
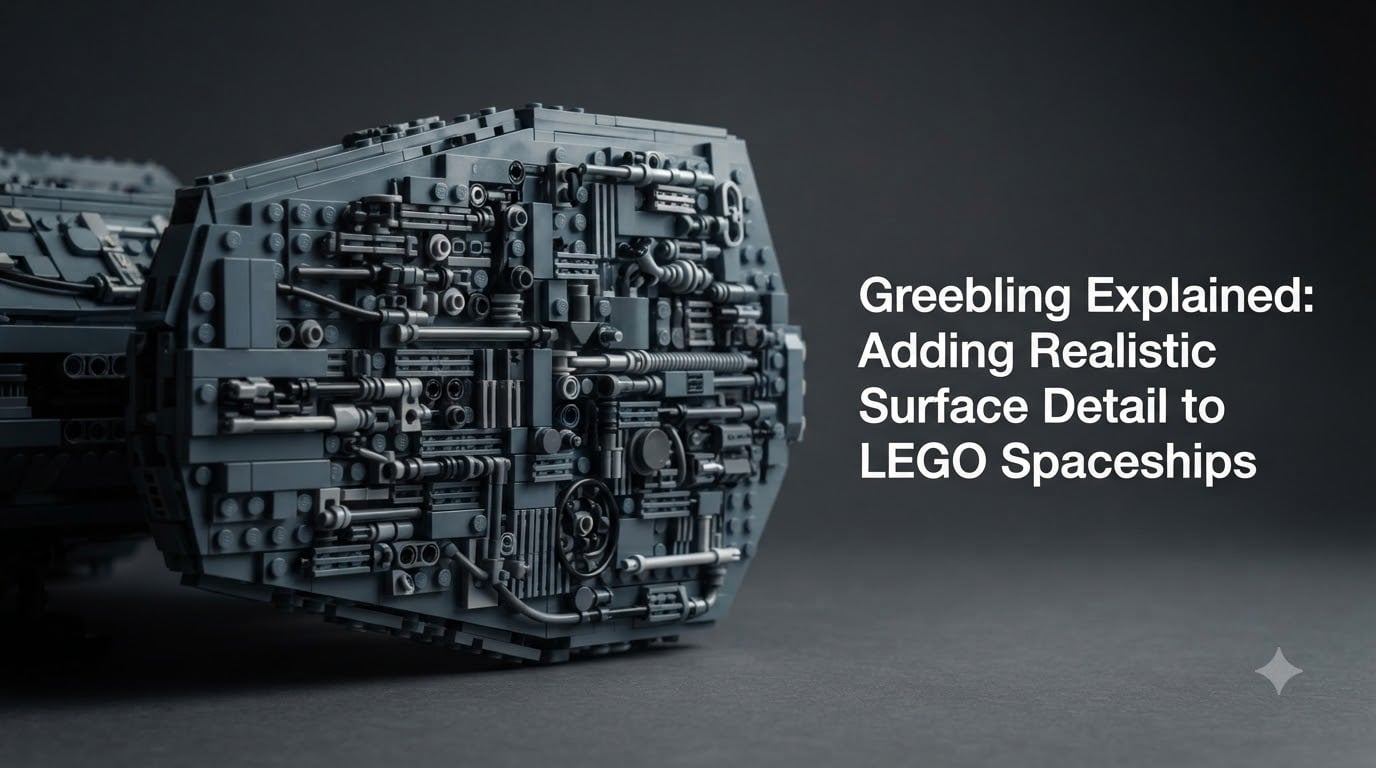
If you have ever stared at a LEGO spaceship and wondered why some models look like toys while others look like miniature film props, the answer is almost always greebling. Greebling is a LEGO building technique that adds small details and texture to the surface of builds to make them appear more realistic and complex, using elements like studs, bars, plates, and mechanical pieces layered onto flat hulls.
I have spent the last three years building MOCs with the adult fan community, and greebling is the single biggest difference between my early builds and what I create today. In this guide, I will walk you through what greebling actually is, where the term came from, where to apply it on your own spaceships, which LEGO pieces work best, and the techniques the top builders use to get that cinematic look. By the end, you will know exactly how to greeble your next build with confidence.
Table of Contents
What Is Greebling and Where Did the Term Come From
Greebling is a sculptural and LEGO building technique that covers a surface with small, intricate details to suggest complex machinery, even though the underlying shape is simple. The term originated at Industrial Light and Magic (ILM), the visual effects studio George Lucas founded to build the original Star Wars spacecraft models. Model makers there started calling the tiny panels, pipes, and vents they glued onto surface kits “greebles” because their work looked too detailed to sculpt cleanly by hand.
The word moved into the LEGO community around 2006, when builder Linus Bohman used “greebling” to describe the surface texturing work on his classic UCS Millennium Falcon. From there, AFOLs (Adult Fans of LEGO) adopted it as shorthand for any technique that breaks up a flat surface with clusters of small parts. Today, every major spaceship builder, from BrickNerd contributors to LEGO Baby Space creators, uses greebling to push their MOCs from “LEGO model” to “screen-accurate miniature.”
The connection to Star Wars is not just historical. ILM built the original Y-wing, X-wing, and Millennium Falcon models by stacking thousands of tiny photo-etched brass and plastic bits onto simple shapes. LEGO builders chasing that same look are doing exactly the same thing, just with ABS plastic bricks instead of styrene and glue. When you greeble a LEGO spaceship, you are recreating the workflow that made the original Star Wars ships feel believable on a movie screen.
Why Greebling Makes LEGO Builds Look Real
Our brains read surfaces as “real” when they have visual noise at multiple scales. A flat 2×4 tile reads as a wall. A 2×4 tile with a 1×1 round plate, a Technic pin, a clip, and a bar attached reads as a control panel on a working machine. Greebling adds that second layer of detail your eye can keep finding, which is what makes a model feel alive instead of static.
I noticed this shift in my own builds around month four of serious MOC work. The first ships I made were clean and smooth, but they photographed poorly and looked like toys at any distance over a few feet. The first time I added greebles to the engine block, the whole model suddenly felt like a piece of hardware instead of a stack of bricks. The texture gave the eye something to land on, and the silhouette stopped looking “cartoony.”
This is why greebling matters so much for realistic LEGO builds. It transforms simple brick assemblies into models that appear to have functional machinery inside them. Even when viewers cannot name a single greeble on the model, they read the surface as engineered, mechanical, and serious. That perception is the entire goal.
Where to Apply Greebling on Your Spaceship
The biggest beginner mistake is greebling everywhere. The strongest LEGO spaceship models concentrate greebles in zones where the viewer’s eye expects mechanical complexity. Here are the seven areas where greebling consistently pays off.
Hull Panels and Side Surfaces
Long, unbroken hull panels are the number one place to break up boring space. A flat gray wall screams “toy,” but the same wall with clusters of vents, exposed greebles, and inset panels reads as a real spacecraft hull. Aim for clusters of three to seven parts grouped together rather than spreading greebles evenly across the entire surface.
Engine Nacelles and Thrusters
Engine areas are begging for mechanical detail because real engines have visible plumbing, intake vents, and exhaust manifolds. Layer small cylinders, Technic pins, and bar elements around the back of your thrusters to suggest the machinery that would power them. This is where the SNOT (Studs Not On Top) technique pays off most, because you can build outward in any direction.
Cockpits and Bridge Areas
Cockpits benefit from greebling because the eye expects controls, screens, and consoles. Add small tile clusters, hinge plates, and 1×1 round pieces around the canopy to suggest avionics bays. Even two or three well-placed greebles can sell the illusion that the pilot is sitting in a working cockpit.
Landing Gear and Undercarriage
The underside of a ship is often flat and forgotten, which makes it a perfect greeble zone. Real aircraft have hydraulic lines, landing gear doors, and structural ribs visible from below. Add small bar and clip elements along the underside to suggest the same engineering on your model.
Weapons and Turrets
Gun barrels and turret housings look weak when they are just smooth cylinders. Wrapping a few plates, wedges, and clips around the base of a turret instantly makes it look like a heavy weapon system. This works for capital ship batteries, starfighter cannons, and mech shoulder guns alike.
Transition Zones Where Shapes Change
Whenever your hull changes from a flat surface to an angled one, or where a wing meets a fuselage, the eye expects a panel seam or joint. Adding a line of greebles along these transitions hides the awkward shape change and sells the geometry as engineered.
Equipment Bays and Access Panels
Small inset rectangles with surrounding detail read instantly as access panels or equipment bays. Cut a 1×2 or 2×3 recess into a hull, frame it with tiles, and add a couple of small detail parts inside. You now have a believable piece of fictional hardware where there used to be empty space.
Best LEGO Pieces for Greebling
Picking the right LEGO parts for greebling is half the battle. The pieces that work best are small, visually busy, and contrast gently with the surrounding hull. After building with hundreds of parts, I have narrowed my go-to greeble parts into five categories.
Small Plates and Tile Clusters
1×1, 1×2, and 1×3 plates and tiles are the bread-and-butter greeble parts. They sit flush against your hull and add visual weight without bulk. Dark gray tiles on a light gray hull create subtle panel lines that read as engineered seams. Stack two or three tiles at offset angles and you have an instant access panel.
Round Elements and Cylinders
Round 1×1 bricks, 1×1 cones, and small cylinders break up the rectangular grid of LEGO and suggest nozzles, sensors, or fasteners. A single round plate in a field of squares draws the eye and creates a focal point for a cluster. These are essential for engine and thruster greebling.
Technic Pieces
Technic pins, axles, connectors, and liftarms add mechanical character because they look like the parts of real machinery. A single black Technic pin sticking out of a hull reads as an antenna, sensor, or hydraulic line. Use them sparingly so they look intentional rather than leftover.
Minifig Accessories
Small minifig accessories like wrenches, swords, bars, and cups are perfect greebles. They have unusual silhouettes that no regular LEGO brick has, which makes them stand out. A small wrench attached to a hull looks like a piece of industrial hardware. They are also cheap and easy to find in bulk on BrickLink.
SNOT Pieces for Sideways Building
SNOT (Studs Not On Top) pieces, including plates with side studs, headlight bricks, and brackets with studs on multiple faces, let you build greebles that stick out from vertical surfaces. Without SNOT parts, your greebles can only stack upward. With them, you can attach pieces in any direction, which is the key to layered, realistic detail.
Core Greebling Techniques Every Builder Should Know
Having the right pieces is only half the work. How you arrange them matters just as much. The strongest greebling follows five principles that the top builders use on every model.
Control Your Density
Good greebling has clusters and breathing room, not an even spread. Aim for areas of high detail next to areas of low detail. The contrast is what creates visual interest. If every square centimeter of your hull is packed with greebles, the eye stops finding anything new and the build reads as chaos.
Balance Symmetry and Asymmetry
Symmetrical greebling reads as engineered and orderly. Asymmetrical greebling reads as worn and lived-in. Most successful spaceships combine both: a symmetrical “spine” of large detail down the centerline with asymmetric clusters off to the sides. This balance looks intentional without looking sterile.
Design With Flow
Your greebles should guide the eye along the surface of the model rather than stopping it dead. Create leading lines using rows of tiles, slopes, or bar elements that follow the direction of the hull. Flow lines make a static model feel like it is moving and give the greebling a sense of purpose.
Vary the Scale
Mix large greeble parts with very small ones in the same cluster. A 1×4 plate next to three 1×1 round plates reads as a much more interesting detail than four plates of the same size. Scale variation is what makes a greeble cluster look like real machinery instead of a wall of LEGO dots.
Recess Some Parts and Expose Others
Real machinery has parts that sit inside the hull and parts that stick out. Recess some greebles by building them into inset panel areas, and let others protrude beyond the silhouette. The mix of recessed and exposed parts adds depth that pure surface greebling cannot match.
Color Choices That Make Greebling Pop
Color is the secret weapon of greebling. The dominant color in serious spaceship builds is bley, which is AFOL shorthand for dark bluish gray (LEGO colors 72 and 194). Bley reads as industrial metal and works as a neutral base for almost any sci-fi palette. Light gray works too, but bley gives more visual depth because it sits closer to black on the value scale.
Stick to two or three colors per cluster. Too many colors and the greebles start looking like confetti rather than machinery. I usually work in bley as the base, add black for the deepest recesses, and use one accent color (often dark red or dark tan) for the rare highlight piece. The accent should be roughly 5 percent of the cluster or less.
Subtle color shifts within the same family can also work. Mixing light bley, dark bley, and black in the same cluster creates depth without breaking the unified look. This is one reason so many Imperial and First Order MOCs look “expensive” – the builders restrict the palette and let the shape of the greebles do the storytelling.
Common Greebling Mistakes and How to Fix Them
Every greebler makes the same handful of mistakes at first. I made all of them. Here is what to watch for and how to fix each one.
Tacked-On Greebling
Tacked-on greebling is detail that looks like it was glued on at the end rather than built into the model. The fix is to integrate greebles into the structural layers of your build so they share connections with the hull underneath. If you can remove a greeble cluster with a single stud connection, it will read as an afterthought.
Over-Greebling
Over-greebling happens when every surface gets the same dense treatment. The fix is to step back, take a photo, and ask whether any one section has more detail than the rest. Remove greebles from quiet areas so the busy areas feel intentional. Less is almost always more.
Random Greebling Without Purpose
This is the most common beginner mistake. Random bits scattered across a hull read as noise, not as machinery. The fix is to imagine a function for each cluster. What would this rectangle of greebles actually do on a real ship? Sensor? Coolant vent? Maintenance access? Once you can answer that question for a cluster, the greebling starts looking right.
All One Color and Shape
Builders who reach for the same part over and over end up with a model that looks like it was decorated with one brick in fifty places. Mix part categories (plates, tiles, rounds, Technic, minifig parts) and mix sizes within each cluster. Variety is what sells the detail.
Advanced Greebling: Weathering, Layering, and Bio-Mechanical Builds
Once you have the basics down, the next level of greebling involves treating the surface like a real object that exists in a real world. Three advanced techniques can push your builds further.
Weathering and Battle Damage
Weathering means suggesting that a ship has been used. Add asymmetric clusters around an engine intake to suggest carbon scoring, or scatter small dark tiles near the front to suggest micrometeorite impacts. Weathering works best when it tells a story: where has this ship been, and what has happened to it?
Layered Greebling
Layered greebling means stacking greebles at different depths instead of attaching everything to the hull surface. Build a small raised plateau, attach a few greebles to that plateau, then attach more greebles to those pieces. The result is a cluster that looks like real machinery instead of stickers on a flat surface.
Bio-Mechanical and Fantastical Greebling
Greebling is not just for hard sci-fi. Bio-mechanical builders combine curved slopes, organic shapes, and insectoid parts to suggest alien machinery. Fantastical greebling leans into asymmetry and unusual part choices to suggest magic or alien technology. Both styles use the same principles of density, flow, and intentionality, just with different part palettes.
FAQs
What is greebling in LEGO?
Greebling in LEGO is a building technique that adds small parts and details to the surface of a build to make it look more realistic and complex. Builders use small plates, tiles, round elements, Technic pins, and minifig accessories to break up flat hulls and suggest functional machinery.
Why is it called greebling?
The term greebling comes from Industrial Light and Magic, the visual effects studio founded by George Lucas. Model makers there used it to describe the tiny photo-etched parts they glued onto Star Wars spacecraft models to make them look more detailed. The LEGO community adopted the term around 2006 when builder Linus Bohman used it to describe his Millennium Falcon MOC.
What is the 5/2 rule in LEGO?
The 5/2 rule in LEGO refers to building in odd-numbered clusters and breaking them up with even spacing. A cluster of three, five, or seven greebles separated by empty space looks more natural than evenly spaced pairs. The eye finds odd numbers more interesting, which is why most professional greeble compositions group details in fives and twos rather than fours and sixes.
What is LEGO’s illegal building technique?
LEGO’s illegal building technique refers to construction methods that use non-LEGO stress or modification to hold pieces together, which violates official building rules but is popular among adult MOC builders. The term can also describe any advanced technique that pushes parts beyond their intended use, such as clipping plates at unusual angles or wedging bars into gaps that the official LEGO designers did not intend.
How do I start greebling as a beginner?
Start greebling by picking one small flat area of a spaceship, gathering 10 to 15 small plates, tiles, round elements, and Technic pins in two or three colors, and arranging them in a tight cluster. Leave at least three times that area of empty hull around the cluster. Take a photo, then remove anything that does not look intentional. Repeat on another small area until the whole ship has a rhythm of greeble clusters and breathing room.
What pieces work best for greebling?
The best pieces for greebling are small plates, 1×1 round plates, tiles, Technic pins and connectors, minifig accessories, and SNOT (Studs Not On Top) parts that allow sideways building. Most greebling relies on parts that are 1×1 or 1×2 in size, because larger parts feel clunky at the scale of surface detail.
Start Greebling Your Own LEGO Spaceships Today
Greebling is what separates a LEGO toy from a LEGO spaceship, and it is easier to start than most builders think. Pick a single small flat panel on your next MOC, gather a handful of small plates, tiles, round elements, and Technic pins, and build one tight cluster that you can imagine having a mechanical purpose. Add another cluster on a different surface. Step back and look at the rhythm. That is greebling, and once you start, your ships will never look flat again.