
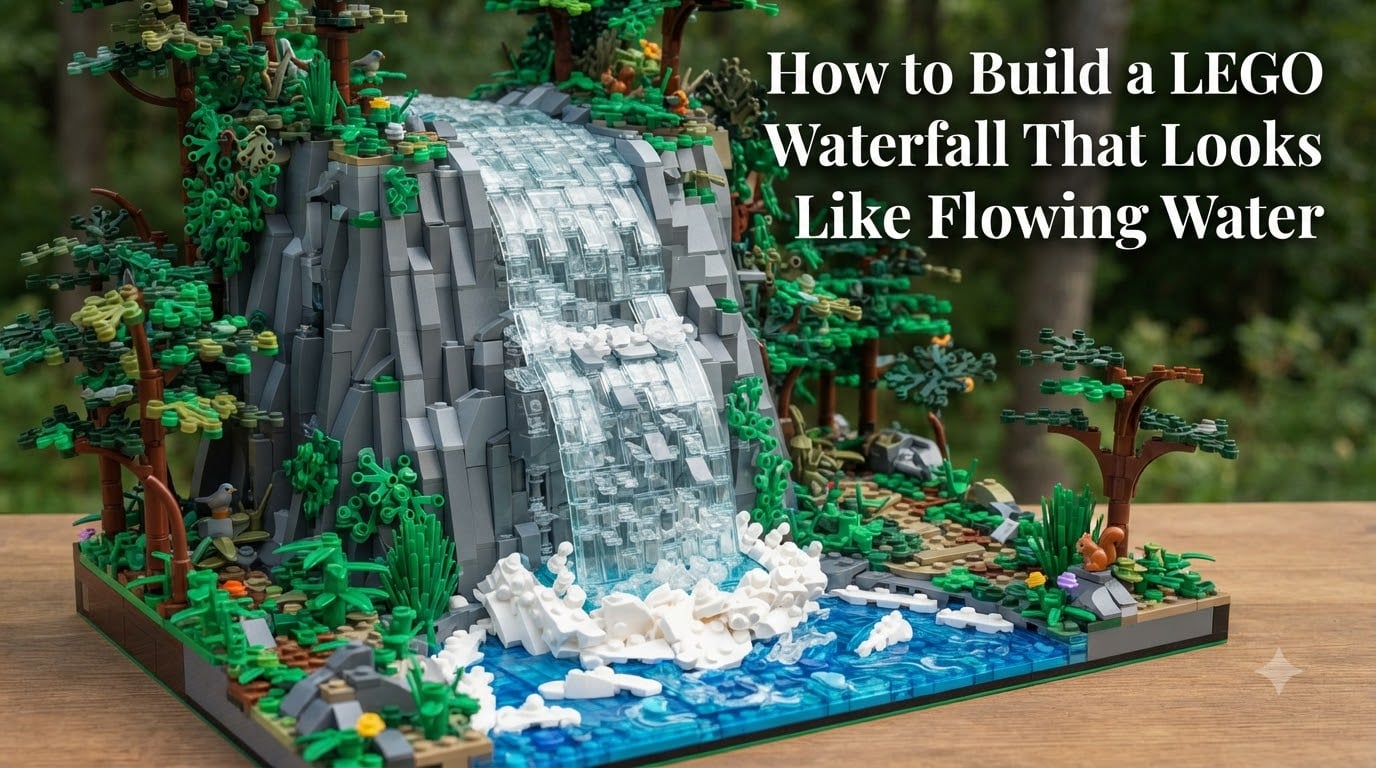
Building a convincing water feature is one of the most satisfying challenges in LEGO MOC building. After testing different approaches across multiple builds, our team put together this complete guide on how to build a LEGO waterfall that looks like flowing water using techniques any builder can learn.
The trick is using the right pieces at the right angles. Curved slopes, trans-clear plates, and SNOT building all work together to trick the eye into seeing moving water. Whether you are building a forest diorama or a castle moat, these methods will give you a cascade that turns heads.
We will walk through each technique step by step, give you a piece shopping list, cover common mistakes, and answer the questions LEGO builders ask most. No advanced techniques required for the basics. You can start with pieces you probably already own.
Table of Contents
What You Need Before You Start: Essential Pieces for a LEGO Waterfall
The right pieces make or break a LEGO waterfall. One of the biggest gaps in existing tutorials is that nobody tells you exactly what to buy. Here is the shopping list we wish we had when we started.
Core water pieces: Trans-clear plates in 1×2, 1×3, and 1×4 sizes form the backbone of any realistic water surface. Trans-light-blue and trans-dark-blue versions add depth variation.
Slope pieces for cascading water: Curved slopes (BrickLink Part 4162) and cheese slopes (Part 54200) create the angled flow that sells the illusion of movement. Stock up on these in both trans-clear and white.
Supporting structural pieces: 1×2 and 1×3 bricks for SNOT mounting, jumper plates (Part 3794) for offset positioning, and wedge plates for shaping the waterfall edges.
Foam and splash pieces: White rounded tiles, white croissants (Part 87744), and ice cream scoop pieces create churning foam at the base. These small details are what separate amateur builds from show-stoppers.
Rockwork pieces: Large slope bricks, rock panel elements, and gray/brown bricks for building the cliff face that your waterfall flows down.
You can source all of these on BrickLink by searching the part numbers above. A basic waterfall build needs roughly 30 to 50 trans-clear pieces plus another 20 to 30 foam and slope pieces for a minifig-scale project.
Technique 1: Curved Slopes for a Flowing Water Cascade
Curved slopes are the single most popular method for creating flowing water, and for good reason. Their rounded edges mimic the natural curve of water spilling over a cliff edge.
Step 1: Build your cliff face using standard bricks and large slope pieces. Leave a flat vertical surface where the waterfall will sit.
Step 2: Attach curved slope pieces (Part 4162) along the top edge of the cliff in trans-clear or trans-light-blue. Face the curved side outward so the smooth edge points down the cliff.
Step 3: Stack additional curved slopes below the first row, offsetting each layer slightly to create a textured cascade. Mix trans-clear with trans-light-blue for a natural color gradient.
Step 4: Add cheese slopes (Part 54200) between the larger curved slopes to fill gaps and create the impression of individual water streams branching off.
Step 5: Step back and check the profile. The waterfall should have a gentle S-curve from top to bottom, not a flat vertical drop. Adjust piece angles until the flow looks organic.
This technique works at any scale and uses common pieces. It is the best starting point for beginners because it is forgiving and easy to modify.
Technique 2: SNOT Method for Smooth Realistic LEGO Water
SNOT stands for “Studs Not On Top.” It is a building technique where you rotate pieces so the stud sides face outward, creating smooth surfaces. For waterfalls, SNOT is the secret to a glassy, flowing surface that curved slopes alone cannot achieve.
Step 1: Build a structural frame using brackets and SNOT brackets (Part 36760 or similar). This frame will hold plates turned on their sides.
Step 2: Mount trans-clear 1×2 and 1×4 plates onto the SNOT bracket studs so they lie flat against the cliff surface, creating a smooth transparent wall.
Step 3: Layer additional trans-clear plates over the first layer, using jumper plates to offset them. This creates a subtle textured surface that catches light differently across the waterfall.
Step 4: Blend the SNOT water surface with curved slopes at the top edge and foam pieces at the base. The SNOT section forms the smooth midsection while slopes handle the transitions.
Step 5: Use rounded tiles along the sides of the SNOT section to round off the waterfall edges. This prevents the harsh rectangular look that gives away the plastic construction.
SNOT takes more planning than curved slopes alone, but the realism is worth it. Forum builders consistently praise SNOT water as the technique that takes a build from good to jaw-dropping.
Technique 3: Trans-Clear Stacked Plates for Transparent Depth
Stacking trans-clear plates creates real physical depth, not just the illusion of it. Light passes through multiple layers of transparent plastic, giving the water genuine luminosity.
Step 1: Start with a base layer of trans-dark-blue plates to represent deep water. This darker base makes upper layers appear brighter by contrast.
Step 2: Stack trans-light-blue plates above the dark layer, stepping back from the cliff face slightly to create a forward-flowing angle.
Step 3: Add trans-clear plates as the topmost layer. The clear plastic over blue layers reads as bright, sunlit water hitting the surface.
Step 4: Insert clear 1×1 round plates between layers at random points. These catch light and create sparkle effects that mimic sunlight reflecting off moving water.
Step 5: Taper the stack so fewer layers exist at the waterfall edges. Real waterfalls thin out at the sides, and this detail sells the realism.
This method pairs beautifully with both curved slopes and SNOT techniques. Use it for the main water body where depth matters most.
How to Create Churning Foam and Splashing at the Waterfall Base
The base of a waterfall is where most builds fall flat. Without foam and splash effects, the water looks like it vanishes into nothing. Forum builders consistently identify the churning base as the hardest part to get right.
White croissants (Part 87744) are the community favorite for churning foam. Cluster several together in white at the point where water meets the pool below.
Ice cream scoop pieces in white and trans-clear add turbulent spray. Position them at angles radiating outward from the impact zone.
White rounded tiles and 1×1 round plates scattered around the base create individual droplets and bubbles. Place these in decreasing density as you move away from the center of impact.
Trans-clear 1×1 plates with vertical clippy bars mounted on the cliff face just above the pool create the impression of spray bouncing back up. This detail is subtle but effective.
The pool itself should use trans-dark-blue plates surrounded by lighter trans-blue at the edges. Place foam pieces partially submerged to blend water and splash naturally.
Microscale vs Minifig-Scale LEGO Waterfalls: Which Works Best
The scale of your build determines which techniques to prioritize. What works for a massive castle diorama will not necessarily work for a small vignette.
Microscale waterfalls use fewer, simpler pieces. Trans-clear 1×1 plates stacked in a stepped pattern create a clean cascade. Curved slopes are usually too large at this scale, so rely on cheese slopes and 1×1 rounds instead. Micro builds are great for practicing technique before committing to a large project.
Minifig-scale waterfalls allow for all techniques simultaneously. You have room for SNOT surfaces, stacked trans-clear layers, curved slopes, and detailed foam bases. This is where you can really show off by combining methods.
Difficulty by scale: Microscale is beginner-friendly because it uses fewer pieces and less structural planning. Minifig-scale is intermediate to advanced because the larger surface area demands more engineering for stability.
If you are new to water building, start micro. A 6-inch microscale waterfall teaches you the core concepts without overwhelming your piece collection or your patience.
How to Build a LEGO Waterfall That Looks Like Flowing Water: Step-by-Step
Here is the complete beginner tutorial that brings all the techniques together. Follow these steps in order for your first flowing water waterfall.
Step 1: Design and build your cliff face using gray and dark gray bricks, large slope pieces, and rock panel elements. Make the face where water will flow as flat as possible.
Step 2: Install SNOT brackets along the cliff face, spaced every 2 to 3 studs apart. These will hold your smooth water surface.
Step 3: Mount trans-clear and trans-light-blue plates on the SNOT brackets, creating a smooth transparent wall down the cliff.
Step 4: Attach curved slopes in trans-clear along the top edge where water spills over. This creates the lip of the waterfall.
Step 5: Add cheese slopes and rounded tiles between the SNOT surface and curved slopes to blend the transition zones.
Step 6: Build the pool at the base using trans-dark-blue plates. Layer trans-blue and trans-clear plates on top for shallow water depth.
Step 7: Add white croissant pieces and ice cream scoop elements at the impact zone for churning foam.
Step 8: Scatter white rounded tiles and 1×1 round plates around the pool for splash and bubble effects.
Step 9: Add surrounding rockwork, vegetation, and terrain details to integrate the waterfall into your scene.
Step 10: Photograph your build under natural light. Trans-clear pieces look their best with daylight hitting them at an angle.
Common LEGO Waterfall Mistakes and How to Fix Them
Even experienced builders hit walls with water features. Here are the most common problems and their solutions, drawn from real forum discussions.
Problem: Waterfall falls forward or sags. This is the number one complaint. The fix is adding structural support behind your SNOT or slope layers. Use 1×2 bricks with brackets to anchor every third row back into the cliff body. Do not rely on a single SNOT bracket to carry a tall waterfall.
Problem: Water looks flat and boring. You are probably using a single piece type or color. Mix trans-clear, trans-light-blue, and trans-dark-blue. Add texture with cheese slopes, 1×1 rounds, and angled plates. Real water has variation.
Problem: Visible studs ruin the illusion. This means you need more SNOT technique. Cover remaining studs with tiles or turn the offending plates sideways. Every visible stud on a water surface breaks the spell.
Problem: Foam looks like a random pile of white pieces. Cluster foam pieces with intention. The densest foam goes at the impact point, thinning outward. Use a radial pattern rather than scattering pieces randomly.
Problem: Colors clash or look unnatural. Stick to trans-clear and trans-blue variants for water, white for foam, and grays for rock. Adding too many colors makes the build look busy and unrealistic.
Advanced Option: Motorized LEGO Waterfalls with Continuous Flow
For builders who want actual movement, motorized waterfalls are the frontier. LEGO Ideas and Rebrickable both feature working waterfall MOCs that use a clever mechanism to circulate elements in a loop, simulating continuous flow.
The basic concept uses a hidden chain or track system behind the cliff face. Trans-clear plates or tiles attach to the track and cycle downward, appearing to flow like real water before recycling back through a concealed channel.
What you need: LEGO Technic chain links, gear wheels, a Power Functions or Powered Up motor, and a frame sturdy enough to support the moving parts. This is an advanced build requiring comfort with Technic engineering.
The LEGO community has shared several working waterfall instructions on Rebrickable. These designs are impressive but demand patience. We recommend mastering static waterfall techniques first before attempting a motorized version.
Motorized waterfalls draw crowds at conventions and make stunning display pieces. The continuous motion effect is something no static build can match.
Integrating Your Waterfall Into Rockwork and Terrain
A waterfall does not exist in isolation. How you build the surrounding terrain determines whether the water feature looks natural or pasted on.
Forest scenes: Frame the waterfall with greenery using plant stems, leaf pieces, and 1×1 round bricks in dark green. Roots and vines hanging over the cliff edge add realism.
Mountain terrain: Use large rock panel elements and varying gray tones for weathered cliffs. Stagger rock layers so the waterfall emerges from a natural crevice rather than a flat wall.
Fortress moats: Connect the waterfall pool to a surrounding moat using trans-blue plates. This turns a standalone feature into part of your castle’s defensive landscape.
Cave settings: Backlight the waterfall from behind using light brick elements. Trans-clear water with a glow behind it creates a magical underground spring effect.
Whatever your scene, the key is blending edges. Transition your rockwork gradually into the water area rather than creating a hard line between stone and stream.
FAQs
How to make a LEGO waterfall?
Build a cliff face, attach curved slope pieces in trans-clear along the top edge for the cascade, layer trans-clear plates on the surface, and add white foam pieces at the base. SNOT technique creates the smoothest water surface. A basic waterfall needs about 30 to 50 transparent pieces.
How to animate LEGO water?
Animated LEGO water uses a hidden Technic chain and motor system behind the cliff face. Trans-clear plates attach to the chain and cycle downward to simulate continuous flow. This is an advanced technique that requires Power Functions or Powered Up motors and a sturdy support frame.
How to build a waterfall step by step for beginners?
Start with a simple cliff face, add curved slopes in trans-clear at the top edge, build the pool with trans-dark-blue plates at the base, add white croissant pieces for foam, and scatter white round tiles for splash. Begin at microscale to practice before tackling larger builds.
How to make a cascade water feature?
A cascade uses stacked curved slopes and cheese slopes angled downward to mimic water spilling over rocks. Offset each layer slightly, mix trans-clear with trans-light-blue plates, and taper the edges so the cascade thins naturally at the sides. Add foam pieces where water meets the pool below.
Bring Your LEGO Builds to Life With Realistic Water
Learning how to build a LEGO waterfall that looks like flowing water comes down to three core techniques: curved slopes for the cascade, SNOT building for smooth surfaces, and trans-clear stacked plates for depth. Add churning foam at the base and you have a water feature that looks genuinely alive.
Start small with a microscale build, master the basics, then scale up to full minifig-size dioramas. Grab your trans-clear plates, sort those white croissants, and start building. Your next MOC is about to get a lot more dynamic.